Smart Drawer Organization Ideas for Kitchen : The kitchen drawer. It seems so simple, so innocent. A shallow space designed to hold utensils, tools, and the various implements of cooking. Yet in kitchens everywhere, drawers have become something else entirely—chaotic catch-alls where spatulas tangle with whisks, where measuring spoons disappear into corners, where the one tool you need is always at the bottom of a pile.
The problem is not the drawer itself but the lack of thoughtful organization within it. A drawer without dividers is just an empty box—and an empty box invites chaos. Items slide around, overlap, and become inaccessible. You buy duplicates because you can’t find the original. You waste minutes digging every time you cook. The frustration accumulates until the drawer becomes a source of stress rather than utility.
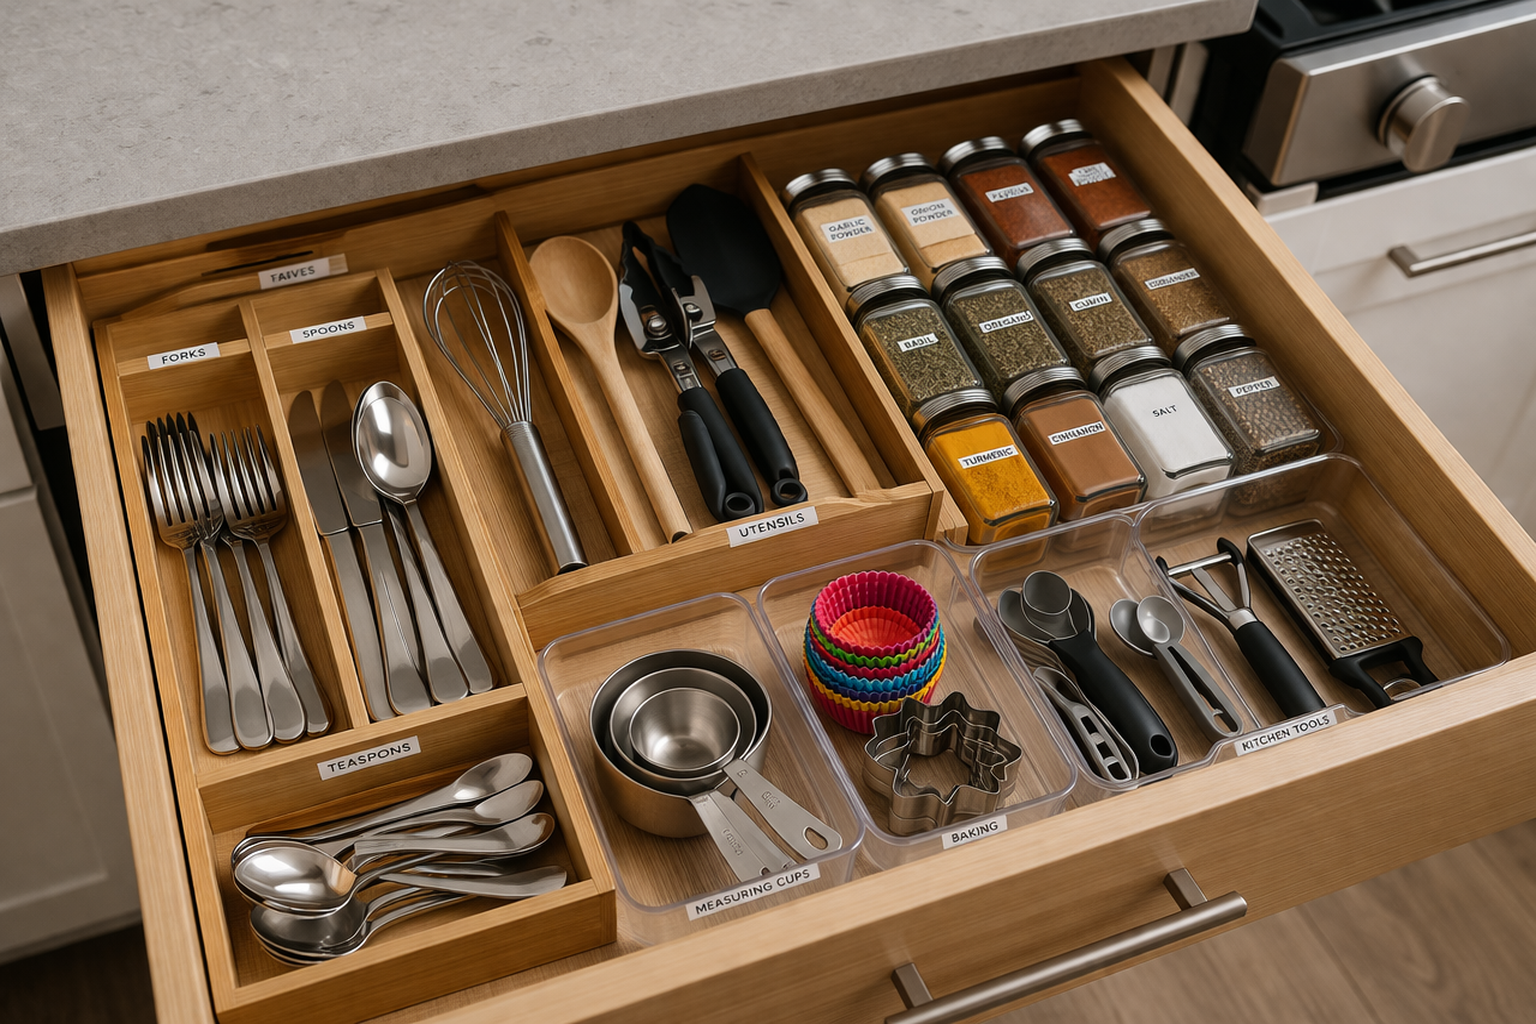
But a well-organized drawer is a thing of beauty. Open it, and everything is visible. Every tool has its place. You reach for what you need and find it immediately. Cooking becomes smoother, more pleasurable, more efficient. The time invested in organization pays dividends every time you open that drawer.
The ideas that follow cover every type of kitchen drawer—from shallow utensil drawers to deep pot drawers, from narrow spice drawers to the dreaded junk drawer. They draw on the experience of professional organizers and the ingenuity of home cooks who have faced the challenge of limited space and too much stuff. Whether you’re organizing a single drawer or overhauling your entire kitchen, these smart ideas will transform your drawers from sources of frustration into models of efficiency.
Read More : How to Declutter Your Kitchen Fast
Vertical Storage Ideas for Small Kitchen Spaces
Simple Pantry Organization Tips for Families
1. The Great Drawer Purge: Start with Nothing
Before any organization can happen, you must empty the drawer completely. Not just moving things aside, but taking everything out and placing it on the counter where you can see it. This is the only way to truly assess what you have and make intentional decisions about what belongs .
As you remove each item, ask yourself the essential questions: Do I use this? Do I love this? Does this belong in this drawer? Be honest. That gadget you bought on impulse and never used? It goes. The third spatula when you only need one? It goes. The mystery tool whose purpose you’ve forgotten? Definitely goes .
For items you use but only occasionally—specialty baking tools, perhaps, or holiday-specific utensils—consider whether they belong in this drawer at all. Perhaps they’d be better stored elsewhere, freeing up prime drawer space for everyday items .
Clean the empty drawer thoroughly. You’ll be amazed at the crumbs, dust, and debris that accumulate in the corners. A clean start makes the organization that follows feel fresh and intentional .
Now, with everything laid out before you, group similar items together. All spatulas in one pile. All measuring spoons in another. All whisks together. This grouping reveals the full extent of your duplicates and helps you make better decisions about what to keep .
2. Adjustable Dividers: The Foundation of Drawer Organization
Once you know what you’re keeping, you need a system for keeping items separated. Adjustable dividers are the foundation of smart drawer organization—they create compartments that prevent items from sliding around and becoming jumbled .
Bamboo dividers have become popular for good reason. They’re adjustable, attractive, and available in various sizes to fit different drawer dimensions. Most systems use expandable sections that you can configure to create custom compartments of any size. This flexibility allows you to adapt as your needs change .
For a more permanent solution, consider fixed wooden dividers. These require some DIY skill—measuring, cutting, and assembling—but the result is custom-fitted organization that looks built-in. Use thin plywood or hobby wood to create a grid of compartments sized specifically for your tools .
For a budget option, tension rod dividers work well. Place tension rods vertically in the drawer to create compartments for baking sheets, cutting boards, or large utensils. They’re adjustable, require no tools, and can be repositioned as needed .
For shallow drawers, consider compartment trays designed specifically for cutlery and utensils. These come in standard sizes and can be dropped into the drawer to create instant organization. Look for trays with adjustable compartments for maximum flexibility .
3. Deep Drawer Solutions: Two Layers Are Better Than One
Deep drawers present both a challenge and an opportunity. Without organization, they become黑洞 where items pile on top of each other, making everything at the bottom inaccessible. But with smart solutions, deep drawers can store twice as much as shallow drawers while keeping everything accessible .
The key is creating two layers of storage. Tiered organizers—sometimes called step organizers—create stepped levels that allow you to see and access items at the back as easily as the front. These work beautifully for spices, condiments, or small jars .
For pots and pans, consider vertical dividers that allow you to store them on their sides rather than stacked. Stacking damages non-stick surfaces and makes accessing the bottom pan difficult. Vertical storage keeps each pan accessible and protects their surfaces .
For lids, separate vertical dividers or a dedicated lid organizer prevent the chaotic pile that inevitably forms. Store lids near their corresponding pots, but in a way that keeps them upright and accessible. Some systems mount on the inside of cabinet doors, freeing up drawer space .
For deep drawers used for storage containers, consider a two-tier system. Use a shallow organizer on top for lids, and store containers below. This eliminates the frustrating search for matching lids that plagues so many kitchens .
4. Utensil Drawer Organization: Daily Tools at Your Fingertips
The utensil drawer is the most frequently used drawer in most kitchens. It deserves thoughtful organization that makes daily cooking effortless .
Start by categorizing your utensils. Group spatulas together—turners, slotted spatulas, spreaders. Group spoons together—solid, slotted, ladles. Group whisks, tongs, and other tools in their own sections. This grouping makes finding what you need intuitive .
Consider frequency of use within the drawer. The tools you use every day—the spatula for flipping eggs, the spoon for stirring—should be in the most accessible spots, typically the front of the drawer. Less frequently used tools can live toward the back .
For long-handled utensils that don’t fit well in standard compartments, consider horizontal storage. Place them diagonally across the drawer, or use a deeper drawer that accommodates their length. Some organizers include longer compartments specifically for these items .
For small items that tend to get lost—measuring spoons, vegetable peelers, garlic presses—create dedicated small compartments. These items need their own homes; otherwise, they’ll disappear under larger tools .
5. Knife Drawer Organization: Safety and Accessibility
Knife storage in drawers requires special consideration. Safety is paramount—loose knives in a drawer are dangerous to reaching hands and damaging to blade edges. But with the right organization, drawer storage can be both safe and accessible .
In-drawer knife blocks are the best solution. These wooden inserts have slots for different knife sizes, holding blades securely and protecting edges. They sit in the drawer, keeping knives accessible while preventing them from sliding around .
For a more flexible solution, consider magnetic knife strips mounted inside the drawer. Mount the strip on the side of the drawer or on the underside of the cabinet above, and knives attach magnetically. This keeps them secure while allowing you to see and access each knife easily .
For budget organization, use drawer dividers to create a dedicated knife compartment. Place knives with blade guards or in sheaths to protect both the blades and hands reaching into the drawer. This is less ideal than dedicated storage but better than loose knives .
Never store knives loose in a drawer. The blades dull from contact with other utensils, and reaching into the drawer risks serious cuts. Proper knife storage protects both your tools and your hands .
6. Spice Drawer Organization: From Chaos to Clarity
Spices present a unique organization challenge. They come in various jar sizes, they’re needed frequently during cooking, and they’re easy to lose in deep drawers. A well-organized spice drawer transforms cooking from frustrating search to effortless access .
The ideal spice drawer is shallow—just deep enough for standard spice jars. This prevents jars from stacking and hiding each other. If your drawer is deeper, use a tiered organizer that creates stepped levels, allowing you to see jars at the back as easily as the front .
Arrange spices in a way that makes sense to you. Alphabetical order works well if you have many spices and can maintain the system. Grouping by cuisine—Indian spices together, baking spices together, herbs together—can be more intuitive for cooking .
Labels are essential. Label the tops of jars so you can identify spices at a glance without picking up each jar. A label maker creates a uniform look, but simple chalk labels or masking tape work too .
For抽屉 that are too deep for single-layer storage, consider custom inserts that hold jars at an angle. These create a stadium effect, with each row slightly elevated above the one in front, making all jars visible simultaneously .
7. Gadget Drawer Organization: Taming the Specialty Tools
Every kitchen accumulates specialty gadgets—the garlic press, the citrus juicer, the vegetable peeler, the cheese grater, the wine opener, the can opener, the corkscrew, the nutcracker, the melon baller, the egg slicer, and countless others. Without organization, these become a jumbled mess .
The key to gadget organization is compartmentalization. Each gadget needs its own designated spot; otherwise, they’ll tangle together and become impossible to separate. Adjustable dividers create custom compartments sized for each tool .
Group similar gadgets together. All opening tools—can openers, bottle openers, corkscrews—in one section. All prep tools—peelers, graters, zesters—in another. This makes finding what you need intuitive .
For gadgets with multiple parts—a garlic press that separates for cleaning, a mandoline with interchangeable blades—store all parts together. Use small containers within the drawer to corral small pieces that would otherwise get lost .
Consider frequency of use. The garlic press you use weekly can live in the main gadget section. The melon baller you use once a year might be better stored elsewhere, freeing up prime drawer space for everyday tools .
8. Baking Drawer Organization: For the Home Baker
For those who bake, a dedicated baking drawer keeps essential tools organized and accessible. Baking requires specific tools—measuring cups and spoons, rolling pin, pastry brush, cookie cutters, piping tips, and more—and having them together simplifies the process .
Start with measuring tools. Dry measuring cups, liquid measuring cups, and measuring spoons each need their own compartments. Nested measuring cups can be stored together, but measuring spoons benefit from individual compartments or a dedicated spoon organizer .
Rolling pins require longer compartments. If your drawer is wide enough, create a horizontal compartment across the front or back. If not, consider diagonal storage or a separate drawer for longer tools .
Cookie cutters can be stored flat in a compartment or upright in a small container within the drawer. For cutters that come in sets, store them together in a small bin that keeps the set contained .
Piping tips and small decorating tools need very small compartments or small containers within the drawer. These tiny items are easily lost; dedicated homes prevent disappearing acts .
For bakeware that doesn’t fit in drawers—baking sheets, cooling racks, muffin tins—consider nearby cabinet storage. The goal is to keep all baking tools in proximity, even if they can’t all fit in the same drawer .
9. Junk Drawer Transformation: From Chaos to Order
Every kitchen has one—the drawer where random items accumulate. Batteries, rubber bands, takeout menus, instruction manuals, twist ties, and things that don’t have a home anywhere else. The junk drawer is inevitable, but it doesn’t have to be chaotic .
The first step is the same as for any drawer: empty everything. You’ll be shocked by what’s accumulated. Sort items into categories: office supplies, hardware, kitchen extras, truly random items. Be ruthless about discarding what you don’t need .
Now create a system. Small containers within the drawer are essential—they corral similar items and prevent the jumble that makes junk drawers unusable. Use small bins, divided trays, or even cleaned food containers to create compartments .
Designate each container for a category. One for batteries, one for pens, one for takeout menus, one for twist ties and rubber bands. Label them if necessary. When everything has a home, the drawer stays organized .
Keep the junk drawer limited to items that truly need to be in the kitchen. Office supplies that belong in a desk should move there. Hardware that belongs in a toolbox should relocate. The junk drawer should contain only kitchen-appropriate items that don’t have another logical home .
10. Under-Sink Drawer Solutions: Maximizing Awkward Space
The space under the sink is rarely configured as drawers—it’s usually a cabinet with a door. But if you’re lucky enough to have under-sink drawers, or if you’re considering a kitchen renovation, this space offers valuable storage potential .
Under-sink drawers require special consideration because of plumbing. Drawers must be designed to accommodate pipes, typically with cutouts or shallow depths that leave room for plumbing underneath .
If you have existing under-sink drawers, use them for items that belong in this zone: cleaning supplies, sponges, scrub brushes, trash bags, and recycling. These items need to be near the sink, and drawers make them more accessible than deep cabinets .
For cleaning supplies, use divided compartments to keep bottles upright and accessible. Small containers within the drawer can hold sponges, scrub brushes, and replacement pads .
For trash bags and recycling bags, a dedicated compartment keeps them contained and easy to grab. Roll bags tightly and store them upright, or use a small bin to corral the rolls .
If your under-sink area is a cabinet rather than drawers, consider adding pull-out drawers as an upgrade. These retrofits transform inaccessible cabinet space into organized, accessible storage .
11. Drawer Liner Basics: Protecting and Griping
Drawer liners serve multiple purposes. They protect the drawer surface from scratches and stains. They provide grip that prevents items from sliding around. And they add a touch of color or pattern that makes opening the drawer more pleasant .
Non-slip liner material is ideal for most kitchen drawers. This grippy material, often sold in rolls, prevents items from shifting when the drawer opens and closes. It’s easy to cut to size and requires no adhesive, making it removable and washable .
For a more decorative option, adhesive liner allows you to add pattern and color. This is permanent—once applied, it’s difficult to remove—so choose carefully. It provides less grip than non-slip liner but more visual appeal .
For drawers that hold sharp items like knives, consider a liner that cushions as well as grips. Some materials provide a slight padding that protects blade edges. This is particularly important for expensive knives .
Replace liners when they become worn or stained. Fresh liner is inexpensive and makes the drawer feel new. It’s a small investment that pays dividends in the pleasure of opening an organized drawer .
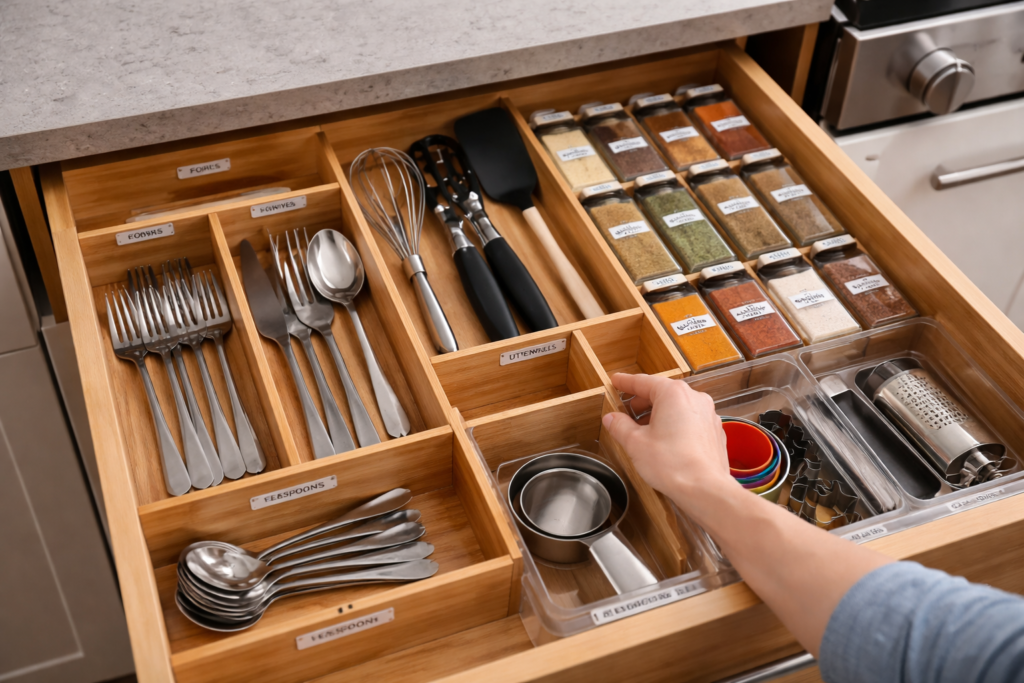
12. Maintenance Systems: Keeping Drawers Organized
The best-organized drawer will return to chaos without maintenance systems. The key is building habits that make tidying effortless .
The first habit is the daily reset. Each time you use a drawer, take a moment to return items to their proper places. That spatula that ended up in the wrong compartment? Put it back. That gadget left on the counter? Return it. This daily attention prevents gradual drift .
The second habit is the weekly check. Once a week, open each drawer and assess. Is everything in its place? Have any items accumulated that don’t belong? Are there any areas that need attention? This weekly check catches problems before they become overwhelming .
The third habit is seasonal auditing. Every few months, empty one drawer completely and reassess. Are you using everything? Has anything new accumulated? Do your compartments still work for your current needs? This regular check ensures your organization evolves with your cooking .
The fourth habit is mindful acquisition. Before buying any new kitchen tool, consider where it will live. If you don’t have space for it, don’t buy it. This thoughtful approach prevents the accumulation that necessitates future organization projects .
| Drawer Type | Best Organization Method | Key Products | Maintenance Tips |
|---|---|---|---|
| Shallow Utensil Drawer | Adjustable dividers, compartment trays | Bamboo dividers, cutlery trays | Daily reset after cooking |
| Deep Drawer | Two-tier organizers, vertical dividers | Step organizers, pan racks | Seasonal audit for accumulated items |
| Knife Drawer | In-drawer knife block, magnetic strips | Wooden knife inserts, magnetic strips | Keep blades protected; sharpen regularly |
| Spice Drawer | Tiered organizers, angled inserts | Stadium-style spice racks, small jars | Label tops; alphabetize or group by cuisine |
| Gadget Drawer | Small compartments, divided containers | Adjustable dividers, small bins | Group by function; store parts together |
| Baking Drawer | Dedicated compartments for measuring tools | Measuring spoon organizers, rolling pin space | Keep baking tools together |
| Junk Drawer | Small containers for each category | Divided trays, small bins | Limit to kitchen-appropriate items |
| Under-Sink Drawer | Vertical storage for cleaning supplies | Small bins, bottle organizers | Keep cleaning supplies separate from food |
| All Drawers | Non-slip liners | Grippy liner material | Replace when worn or stained |
The Psychology of Organized Drawers
The benefits of organized drawers extend far beyond the practical. There is a psychological dimension to order that affects how we feel about our kitchens and, by extension, about cooking itself .
A chaotic drawer creates friction. Every time you need something, you must overcome that friction—searching, digging, moving things aside. This friction accumulates over days and weeks, subtly discouraging cooking. You might not consciously decide to cook less because your drawers are messy, but the accumulated frustration makes takeout more appealing .
An organized drawer, by contrast, creates flow. Everything has a place, everything is accessible, nothing obstructs anything else. Cooking becomes easier, more pleasant, more frequent. The time and energy invested in organization pay dividends every time you open that drawer .
There is also a satisfaction in order itself—the pleasure of opening a drawer and seeing everything neatly arranged, of knowing exactly where everything is, of having a space that reflects your values and supports your life. This satisfaction is not trivial; it contributes to your overall sense of well-being and your relationship with your home .
Implementation Strategy: One Drawer at a Time
The prospect of organizing all your kitchen drawers can be overwhelming. The key is to start small and build momentum. Choose one drawer—the one that frustrates you most—and organize it completely using the principles above. Experience the satisfaction of that single organized drawer. Then move to the next .
This gradual approach has several advantages. It prevents burnout. It allows you to refine your techniques as you go. It builds momentum—each organized drawer motivates you to tackle the next. And it immediately improves your kitchen, even before the project is complete .
As you work through each drawer, document what works and what doesn’t. Pay attention to how you actually use the space. Adjust your systems based on real experience rather than theory. The goal is not a magazine-perfect kitchen but a kitchen that works for you .
Conclusion : Smart Drawer Organization Ideas for Kitchen
Smart drawer organization transforms the kitchen from a source of frustration into a space of possibility. It makes cooking easier, more pleasant, more frequent. It saves time, reduces stress, and prevents the wasteful duplication that occurs when you can’t find what you already own .
The principles outlined here—purging ruthlessly, using adjustable dividers, creating two-tier storage in deep drawers, organizing utensils by category, protecting knives properly, taming spices and gadgets, transforming the junk drawer, and maintaining systems over time—provide a comprehensive toolkit for drawer organization .
Not every solution will work for every kitchen. The key is understanding the principles and applying them in ways that make sense for your specific space, your specific needs, and your specific habits. Start with what frustrates you most, apply the relevant principles, and build from there .
The reward is not just better-organized drawers but a better relationship with your kitchen. When every drawer opens to reveal order rather than chaos, cooking becomes a pleasure rather than a chore. You cook more, you cook better, and you enjoy the process more. That is the true promise of smart drawer organization—not just order, but a richer, more satisfying culinary life .