How to Declutter Your Kitchen Fast : The kitchen accumulates stuff faster than any other room in the house. Gadgets we bought on impulse and never used. Duplicates we forgot we owned. Containers without lids and lids without containers. Appliances that seemed like good ideas at the time. Ingredients purchased for one recipe and never touched again. The kitchen, meant to be a space for nourishment and creativity, becomes instead a monument to accumulation.
The thought of decluttering can feel overwhelming. Where do you even start? How do you make decisions about what stays and what goes? What if you need something later? These questions paralyze us, and the clutter remains.
But fast decluttering is possible. It requires a different mindset—not perfection, but progress. Not agonizing over every item, but making rapid decisions based on clear criteria. Not organizing what you keep, but first removing what you don’t need. The goal is not a magazine-perfect kitchen but a functional one, where you can find what you need and actually enjoy being there.
This guide is designed for speed. It breaks the kitchen into manageable zones, provides clear decision-making criteria, and offers time-based strategies for different decluttering windows. Whether you have an hour, an afternoon, or a weekend, you can make significant progress. The key is starting, and this guide will show you exactly how.
Read More : Vertical Storage Ideas for Small Kitchen Spaces
Simple Pantry Organization Tips for Families
Open Shelving Kitchen Organization Ideas
Kitchen Storage Ideas for Indian Homes
How to Organize Spices in Small Kitchen
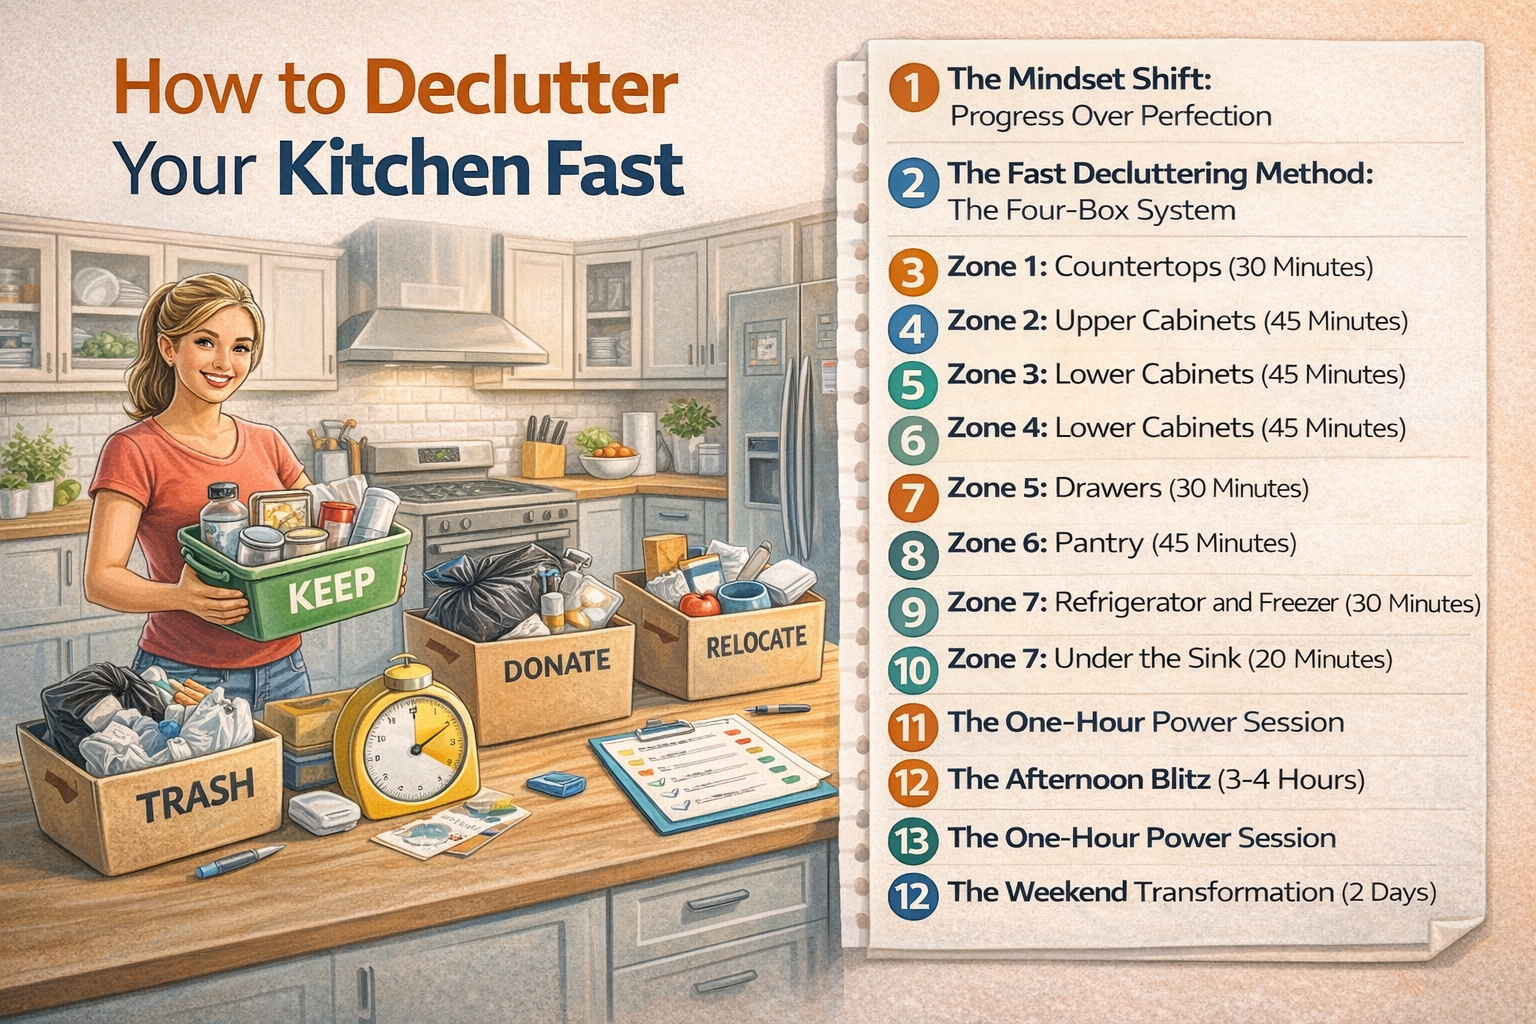
1. The Mindset Shift: Progress Over Perfection
Before you touch a single item, you must adopt the right mindset. Without it, you’ll get stuck agonizing over decisions and the process will stall .
The first mindset shift is accepting that done is better than perfect. Your kitchen doesn’t need to look like a magazine spread. It needs to work for you. A kitchen that is 80 percent decluttered is infinitely better than one that’s 0 percent decluttered because you were waiting for the perfect plan .
The second shift is embracing that you can’t organize clutter. Organizing is what you do after you’ve removed what you don’t need. Trying to organize too much stuff is like rearranging deck chairs on a sinking ship. Focus first on removal .
The third shift is letting go of sunk costs. That expensive gadget you never use? The money is spent whether you keep it or donate it. Keeping it doesn’t recover the cost; it just continues to occupy space and create guilt. Let it go .
The fourth shift is trusting your future self. Yes, there’s a tiny chance you might need that obscure tool someday. But the cost of storing it for years outweighs the cost of buying it again if that someday actually arrives. Most “someday” items never become “today” items .

2. The Fast Decluttering Method: The Four-Box System
For rapid decluttering, you need a system that forces quick decisions. The four-box system is simple and effective .
Gather four boxes or bags and label them:
- Keep: Items you use regularly and genuinely need
- Donate: Items in good condition that someone else can use
- Trash: Items that are broken, expired, or unusable
- Relocate: Items that belong in another room
As you go through each zone, every item must go into one of these boxes immediately. No “maybe” pile. No “I’ll decide later.” The box system forces commitment .
The “keep” box is for items that pass your decision criteria. Everything else leaves the kitchen now—either to another room, to donation, or to trash. This immediate removal is crucial. If you leave donation items sitting in the kitchen, they’ll likely migrate back into drawers .
Work quickly. Don’t agonize. If you haven’t used an item in a year, it probably goes. If you forgot you owned it, it definitely goes. Trust your gut and move on .
3. Zone 1: Countertops (30 Minutes)
Countertops are the most visible area of your kitchen. Clearing them makes an immediate visual impact and creates workspace for actual cooking .
Start by removing everything from your counters. Every appliance, every utensil holder, every jar, every piece of decor. Place everything on your table or floor where you can see it .
Now evaluate each item. Appliances you use daily—coffee maker, toaster—can earn a spot back on the counter. Appliances you use weekly should live in cabinets and come out when needed. Appliances you use monthly or less should be stored elsewhere or donated .
Utensil holders often accumulate more utensils than anyone needs. Keep your most-used tools—spatula, wooden spoon, ladle—and donate the rest. Store backups in drawers .
Decor items should be minimal. One or two meaningful pieces can stay, but if your counters are cluttered with decorative items you don’t really love, let them go .
Before returning any item, clean the counter thoroughly. A clean surface makes everything feel fresher .
4. Zone 2: Upper Cabinets (45 Minutes)
Upper cabinets store items you use regularly—dishes, glasses, mugs, and frequently used ingredients. They’re also where forgotten items accumulate at the back .
Open one cabinet at a time. Remove everything. Yes, everything. You need to see the full contents to make good decisions .
As you remove items, check for damage. Chipped dishes, cracked glasses, mugs with sentimental value you never actually use—these go in the donate or trash boxes .
Be honest about duplicates. How many coffee mugs does one household need? Keep your favorites, your most-used, and perhaps a few for guests. Donate the rest .
Consider frequency of use. Items you use daily should be on lower, more accessible shelves. Occasional items can go higher. If you haven’t used something in a year, it shouldn’t be in your kitchen .
Before returning items, wipe down shelves. Clean cabinets feel different from dirty ones, and this is your chance to start fresh .
5. Zone 3: Lower Cabinets (45 Minutes)
Lower cabinets store heavier items—pots, pans, small appliances, and bulk ingredients. They’re also where things get pushed to the back and forgotten .
Empty one cabinet at a time. As you remove items, group similar things together. All pots in one pile, all lids in another. This grouping reveals duplicates and makes inventory clear .
For pots and pans, be honest about what you actually use. That beautiful Dutch oven you bought but never cooked in? If you haven’t used it in a year, it’s time to let it go. Keep your daily drivers; donate the rest .
For lids, match them to pots. Lids without matching pots go. Pots without matching lids either find a universal lid or go .
For small appliances, apply the same frequency test. If you use it weekly, it can stay. If it’s been in the back of the cabinet for two years, it’s time to donate it .
Check expiration dates on any food stored in lower cabinets. Bulk ingredients can go bad. If it’s expired, toss it .
6. Zone 4: Drawers (30 Minutes)
Drawers are where small items accumulate and chaos thrives. Without organization, they become junk drawers where nothing can be found .
Empty each drawer completely. As you remove items, you’ll likely find things you forgot you owned. This is normal .
For utensil drawers, keep only what you actually use. That specialized gadget you bought for one recipe years ago? Let it go. The third spatula when you only need one? Let it go .
For junk drawers, this is your chance to transform them. Sort items into categories: pens, batteries, takeout menus, tools. Discard anything broken or expired. For what remains, consider whether it truly belongs in the kitchen .
Before returning items, consider simple organization. Group similar items together. Use small containers or dividers if you have them. Even without products, grouping by category makes drawers more functional .
7. Zone 5: Pantry (45 Minutes)
The pantry is often the most cluttered area, with expired food and forgotten ingredients accumulating on shelves .
Empty everything from your pantry. Every can, every box, every jar. This is the only way to truly see what you have .
Check expiration dates ruthlessly. Anything past its date goes in the trash. This alone often clears significant space .
For items still in date, evaluate whether you’ll actually use them. That specialty ingredient for a cuisine you don’t typically cook? If you haven’t used it in a year, you probably never will. Donate unopened items; discard opened ones .
Group similar items together as you sort. All canned vegetables in one area, all pasta in another, all baking supplies together. This grouping makes it easier to see what you have .
Before returning items, wipe down shelves. A clean pantry feels different from a dirty one .
8. Zone 6: Refrigerator and Freezer (30 Minutes)
The refrigerator and freezer are often overlooked in decluttering, but they deserve attention. Expired food takes up space and creates unpleasant odors .
Start with the refrigerator. Remove everything, shelf by shelf. Check expiration dates on all items. Condiments, in particular, can linger long after they should have been discarded .
For leftovers, be honest. If you’re not going to eat them, toss them now. They’ll only get pushed to the back and discovered months later .
Wipe down shelves before returning items. This is also a good time to check for spills and clean them up .
For the freezer, similar rules apply. Check for freezer burn. If you don’t recognize an item, you probably won’t eat it. Be ruthless about old items taking up space .
Group similar items together as you return them—dairy together, condiments together, leftovers in one area. This makes finding things easier .
9. Zone 7: Under the Sink (20 Minutes)
The under-sink area is often a chaotic mess of cleaning supplies and forgotten items. It deserves attention .
Remove everything. Check expiration dates on cleaning supplies—they do expire and lose effectiveness. Discard anything old or empty .
Group similar items together: all-purpose cleaners, glass cleaners, sponges, trash bags. This reveals duplicates and makes inventory clear .
Consider whether everything under the sink belongs there. Some items—like bleach and ammonia—should be stored safely away from each other. Others—like food storage—should not be under the sink at all due to temperature and moisture fluctuations .
Before returning items, check for leaks or moisture issues. Address any problems now, before they damage your newly organized space .
10. The One-Hour Power Session
If you have only one hour, focus on the areas that will make the biggest visual impact. Countertops and the most visible cabinet are your priorities .
Set a timer for one hour. Work as quickly as possible, making fast decisions. When the timer goes off, stop. You’ve made progress .
In one hour, you can likely complete countertops and one cabinet, or make significant progress in the pantry. The key is not finishing everything but starting .
After the hour, step back and appreciate what you’ve accomplished. A visible difference motivates continued effort .
11. The Afternoon Blitz (3-4 Hours)
With an afternoon, you can make substantial progress. Start with the most visible areas—countertops and upper cabinets—then move to drawers and pantry .
Work in zones, completing one before moving to the next. This provides a sense of accomplishment that fuels continued effort .
Take a short break halfway through. Step away, have water, and return with fresh eyes. You’ll make better decisions after a brief rest .
At the end of the afternoon, you should have completed countertops, upper cabinets, drawers, and made significant progress in the pantry. Your kitchen will look and feel dramatically different .
12. The Weekend Transformation (2 Days)
With a full weekend, you can completely transform your kitchen. This requires commitment but yields remarkable results .
Start Saturday morning with the purge. Remove everything from all cabinets, drawers, and pantry. Sort into your four-box system as you go. This full emptying is uncomfortable but necessary for complete transformation .
Saturday afternoon, deep clean all empty spaces. Wipe shelves, clean inside drawers, scrub the refrigerator. This is your chance to start fresh .
Sunday, begin returning items using the principles you’ve learned: frequency of use, grouping by category, accessibility. This is where organization happens .
By Sunday evening, you should have a completely transformed kitchen—everything in its place, nothing unnecessary taking up space. The effort of a weekend yields months and years of easier cooking .
| Zone | Time Estimate | Key Actions | Decision Criteria |
|---|---|---|---|
| Countertops | 30 minutes | Remove everything, evaluate appliances, clean | Daily use only earns counter space |
| Upper Cabinets | 45 minutes | Empty completely, check for damage, evaluate duplicates | Use within year; love it or lose it |
| Lower Cabinets | 45 minutes | Empty, group similar items, match lids to pots | Heavy items lower; use within year |
| Drawers | 30 minutes | Empty, evaluate gadgets, group by category | If you forgot you owned it, it goes |
| Pantry | 45 minutes | Empty, check expiration, group by category | Expired goes; unopened unused donates |
| Refrigerator | 30 minutes | Remove everything, check dates, clean | If you won’t eat it, toss it now |
| Under Sink | 20 minutes | Remove, check dates, group supplies | Expired goes; keep only what belongs |
The Aftermath: What to Do With What You’ve Removed
Decluttering creates a mountain of stuff that needs to leave your home. Have a plan for each category .
For donate items, get them out immediately. Load them in your car and drop them off today. If they sit in your garage or hallway, they’ll migrate back into your kitchen .
For trash items, dispose of them properly. Check local regulations for hazardous waste—cleaning supplies, batteries, and electronics may require special handling .
For relocate items, put them in their proper homes now. That pile of papers belongs in the office. Those tools belong in the garage. Don’t let them sit in the kitchen .
Preventing Re-Clutter
A decluttered kitchen will stay that way only if you change the habits that created the clutter in the first place .
Implement the one-in, one-out rule. For every new item that comes into your kitchen, one similar item must leave. Buy a new spatula? Donate an old one .
Be mindful about acquisitions. Before buying anything for your kitchen, ask yourself: Where will it live? Do I really need it? What will I give up to make room for it ?
Do a monthly five-minute tidy. Each month, spend five minutes walking through your kitchen, returning stray items to their homes and assessing whether anything has accumulated .
Do a seasonal audit. Every few months, take one cabinet or drawer and reassess. Are you using everything? Has anything snuck in that doesn’t belong ?
The Emotional Dimension
Decluttering is emotional. You’ll feel guilt about items you spent money on but never used. You’ll feel anxiety about letting go of things you might need someday. You’ll feel attachment to items with sentimental value .
Acknowledge these feelings, but don’t let them control your decisions. The guilt of wasted money is not relieved by keeping the item. The anxiety about “someday” is usually unfounded. Sentimental items can be kept in small numbers, but not everything needs to stay .
Focus instead on how you’ll feel when your kitchen is functional and peaceful. Focus on the ease of finding what you need. Focus on the pleasure of cooking in a space that supports rather than frustrates you. That feeling is worth the temporary discomfort of decluttering .
Conclusion : How to Declutter Your Kitchen Fast
Decluttering your kitchen fast is possible. It requires a clear system, quick decisions, and a commitment to progress over perfection. The four-box method, the zone approach, and the time-based strategies in this guide provide a roadmap for rapid transformation .
Start where you are. If you have only an hour, do the countertops and one cabinet. If you have an afternoon, tackle the visible areas. If you have a weekend, go all in. Every minute spent decluttering pays dividends in easier cooking and more pleasant meals .
The kitchen you want—functional, peaceful, enjoyable—is within reach. It’s buried under the clutter, waiting to be revealed. With this guide, you have the tools to uncover it. Start now. Your future self will thank you every time you cook .