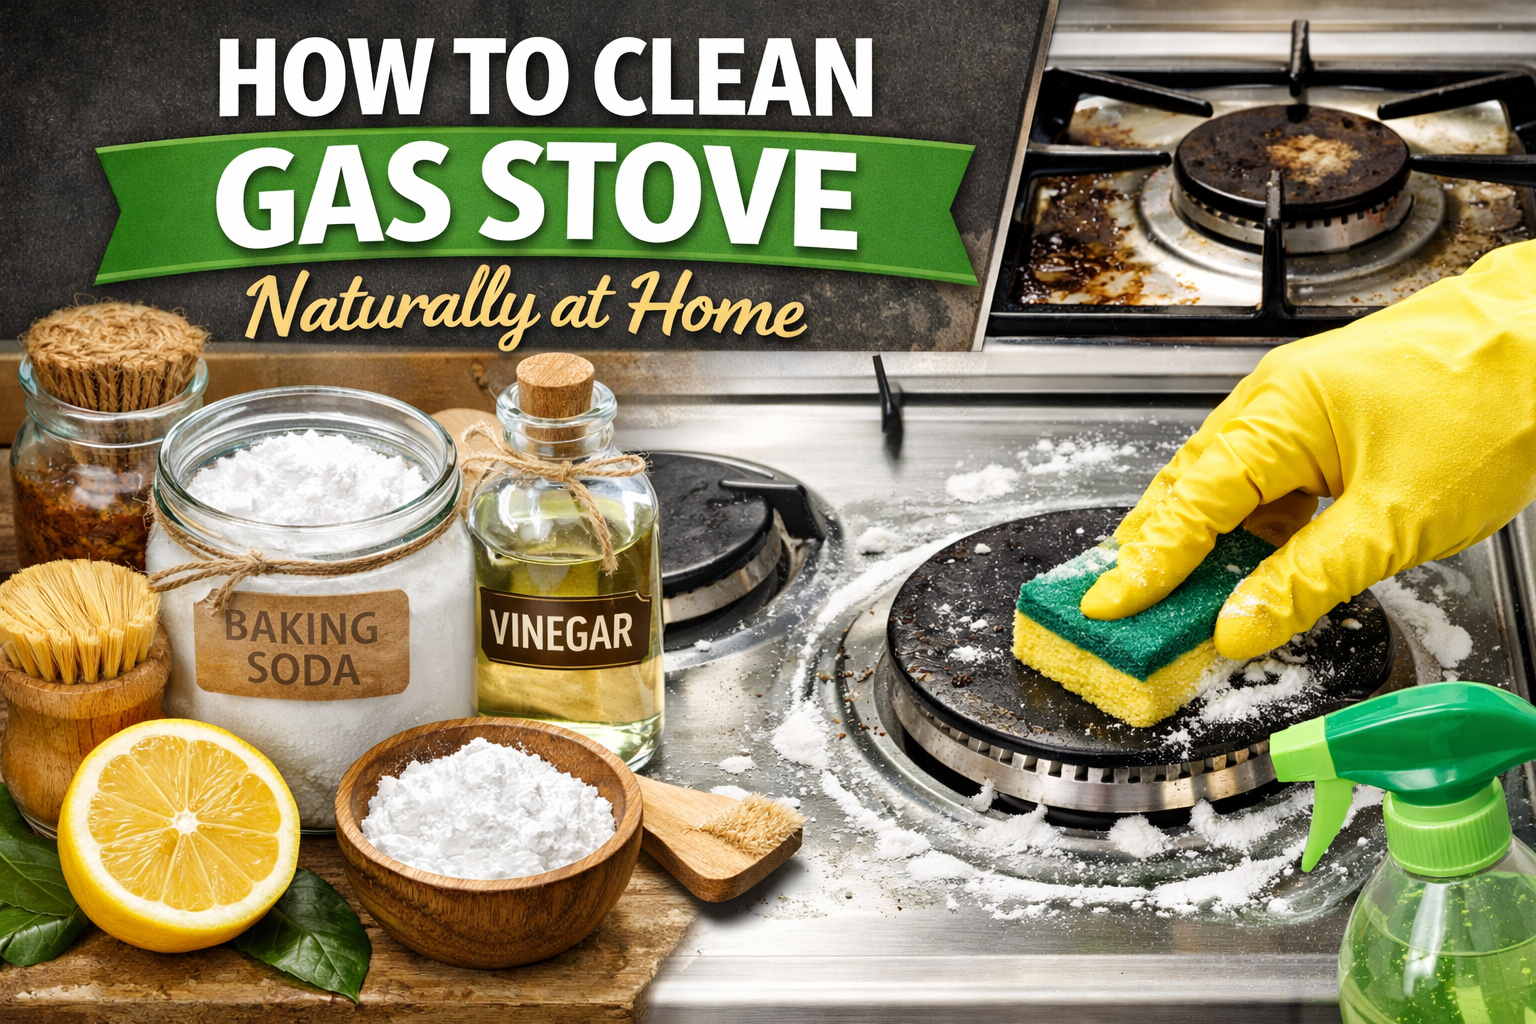
How to Clean Gas Stove Naturally at Home : The kitchen is the heart of the home, and the gas stove is the fiery core of that heart. It is the workhorse that simmers your sauces, boils your pasta, and sears your steaks. But with great cooking comes great responsibility, and often, a significant amount of grime. The accumulation of baked-on food, greasy splatters, and stubborn stains is an inevitable reality for any home cook. While the market is flooded with harsh chemical cleaners promising a sparkling stove in seconds, they often come with a downside: strong, potentially harmful fumes, a slippery residue that’s hard to rinse, and a hefty price tag.
Fortunately, there is a better, safer, and remarkably effective way. By turning to your pantry, you can wage a successful war on kitchen grime using simple, natural ingredients. This isn’t just about being environmentally conscious; it’s about creating a healthier home for your family, free from unnecessary toxins. This comprehensive guide will walk you through every single step of the process, from understanding why natural cleaners work to the meticulous art of reassembling your stove. We will cover daily maintenance and deep-cleaning rituals, ensuring your gas stove remains a gleaming and efficient appliance for years to come. Prepare to roll up your sleeves and discover the transformative power of baking soda, vinegar, and a little bit of elbow grease.
Part 1: Understanding Your Arsenal – The Power of Natural Ingredients
Before we dive into the cleaning process, it’s essential to understand the ‘why’ behind the ingredients we’ll be using. Nature has provided us with a cleaning toolkit that is powerful, non-toxic, and inexpensive. Each component plays a specific role in breaking down the complex chemistry of kitchen messes.
- Baking Soda (Sodium Bicarbonate): This is the undisputed champion of natural cleaning. It’s a mild alkali, which means it can react with acids and help dissolve greasy, oily soils. Its real superpower, however, is its gentle abrasiveness. On a microscopic level, baking soda crystals are soft enough to scrub away burnt-on food and residue without scratching the surfaces of your stove, grates, or enamel. Think of it as a million tiny, soft scrubbers working for you. It’s also a natural deodorizer, absorbing and neutralizing lingering cooking odors rather than just masking them with fragrance.
- White Vinegar (Acetic Acid): Distilled white vinegar is a pantry staple that doubles as a phenomenal cleaner. Its mild acidity is excellent for cutting through grease, dissolving mineral deposits (like hard water spots), and breaking down the bond between stubborn residue and the stove’s surface. When combined with baking soda, it creates a fizzing action that provides a mechanical lift, helping to dislodge dirt from crevices. Furthermore, vinegar is a natural disinfectant and deodorizer, killing some common household bacteria and leaving a clean, crisp scent that dissipates quickly.
- Lemon Juice (Citric Acid): Fresh lemon juice is another potent source of citric acid. Its grease-cutting power is formidable, and it has the added benefit of a bright, cheerful, and completely natural fragrance. Lemon juice is particularly effective at tackling burnt-on messes and can help to shine stainless steel components. The natural oils in the peel (if you choose to use a spent lemon half as a scrubber) also add to its cleaning power.
- Liquid Castile Soap: This vegetable-based soap is a far cry from harsh chemical detergents. It is a highly effective surfactant, which means it reduces the surface tension of water, allowing it to penetrate and lift away grease and food particles more easily. A small amount of unscented or lightly scented Castile soap goes a long way in boosting the cleaning power of your soaking solutions.
- Coarse Salt (like Kosher or Sea Salt): Salt acts as an even more abrasive scrubber than baking soda. It’s perfect for the toughest, most stubborn, burnt-on patches on cast-iron grates or porcelain surfaces. Because the crystals are larger and harder, they provide serious scrubbing power, but they will dissolve in water, so there’s no risk of them scratching permanently if used with care.
Armed with these five ingredients, you have everything you need to tackle any level of gas stove grime. Now, let’s move on to the practical application.
Part 2: Preparation and Safety – Setting the Stage for Success
Cleaning a gas stove involves dealing with fragile parts and a source of fuel. Taking a few minutes to prepare properly is not just about efficiency; it’s about safety.
- The Golden Rule: The Stove Must Be Cool: This cannot be overstated. Never attempt to clean a gas stove that has been used recently. The burners, grates, and the surrounding metal or glass surface can remain hot enough to cause severe burns for a significant time after cooking. Allow the stove to cool down completely, which can take an hour or more after heavy use.
- Safety First – The Gas Supply: For ultimate peace of mind, especially when you plan to do a deep clean that involves moving parts and a lot of moisture, locate the gas shut-off valve for your stove. This is typically a small valve on the gas line behind or beside the stove. Turning it a quarter turn so it’s perpendicular to the pipe will cut off the gas flow. This is an extra precaution to prevent any gas from seeping out if a knob is accidentally turned while the burners are disassembled.
- Clear the Area: Move any pot holders, spice jars, utensil crocks, or other items from the countertops near the stove. This gives you ample room to work and prevents them from getting splashed with your cleaning solutions.
- Ventilation is Key: Even though you’re using natural ingredients, it’s a good practice to open a kitchen window or turn on the range hood. This helps to clear the air of any vinegar or lemon smells and provides general ventilation.
- Gather Your Tools and Ingredients: Assemble everything you will need on a tray or in a caddy so you aren’t searching for items with soapy hands. You will need:
- Baking soda
- White vinegar in a spray bottle
- Liquid Castile soap or a natural dish soap
- A lemon (optional)
- Coarse salt (optional)
- A large bucket or your clean kitchen sink
- An old, soft-bristled toothbrush
- A non-scratch scrubbing sponge (like a cellulose sponge with a gentle scrubby side)
- Several clean, soft microfiber cloths (these are superior to paper towels as they are lint-free and more absorbent)
- A small bowl for mixing pastes
- A straightened paper clip or a needle
- A small, dry paintbrush or an unused makeup brush (for dusting)
With your workspace prepped and your tools at the ready, we can begin the disassembly.
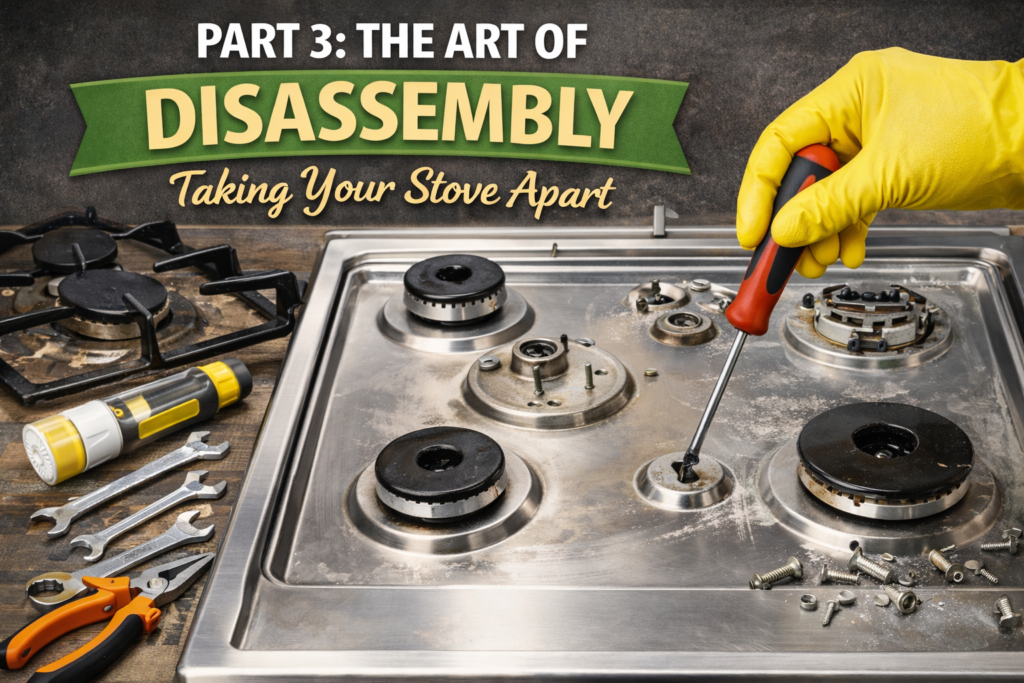
Part 3: The Art of Disassembly – Taking Your Stove Apart
A gas stove is a system of parts, and to clean it thoroughly, you need to separate them. This process is generally straightforward, but paying attention to where each piece goes is crucial for smooth reassembly.
- Remove the Grates: These are the heavy metal frames that sit on top of the stove and hold your pots and pans. Simply lift them straight up and off. Place them aside. If they are exceptionally heavy or large, you might want to move them directly to the sink or your soaking bucket to save some lifting later.
- Remove the Burner Caps: Each burner has a metal cap that sits on top. These are usually just sitting in place. Lift them off. They are often different sizes (front burners might be larger than back burners), so it’s wise to arrange them in a specific order on the counter, like a diagram of your stove, so you know exactly where they go back.
- Remove the Burner Heads (The Base): Underneath the cap is the burner head or base. This is the part that has the small holes or ports where the gas flames emerge. On many stovetops, these heads lift straight out as well. On some models, they might have a small screw or be fitted more snugly. If they resist, do not force them. A gentle wiggle back and forth while pulling upward usually does the trick. Place these next to their corresponding caps in your arranged diagram.
- Remove the Control Knobs: The knobs are typically push-ons. Grip each knob firmly and pull it straight toward you. They might be on tight, so a steady, even pressure is more effective than a sudden yank. If you encounter resistance, you can try slipping a thin, sturdy piece of fabric (like an old cloth belt) behind the knob to gently lever it off, protecting the surface from scratches. Again, keeping them in order is a good idea, as the markings might be specific to each burner (e.g., front left, rear right).
- Identify the Igniters: Take a moment to locate the igniters. These are the small, usually porcelain or metal, devices, often with a small prong or electrode, located near each burner. They are responsible for creating the spark that lights the gas. They are often fragile. Do not attempt to remove them. They will be cleaned in place, very gently.
Now that your stove is just a bare surface with a few sensitive components, you have two separate cleaning missions: the removable parts and the stovetop itself.
Part 4: The Deep Soak – Rehabilitating Burner Caps, Heads, and Grates
The removable parts bear the brunt of the cooking action. They are subjected to direct flame, boiling-over liquids, and spattering grease. They will need more than a quick wipe. They need a therapeutic soak.
Step 1: The Soaking Solution
Fill your kitchen sink or a large bucket with the hottest water your tap can produce. The heat is crucial for liquefying grease. Add a generous squeeze of your natural dish soap or Castile soap (about 2-3 tablespoons) and slosh it around to create suds. For an extra grease-fighting boost, add a cup of white vinegar directly to the water.
Step 2: Submerge and Wait
Carefully place your grates, burner heads, and burner caps into the hot, soapy water. If your sink isn’t big enough for the grates, you can soak half, then flip them. Make sure all parts are fully submerged. Now, patience is your greatest tool. Let them soak for at least 30 minutes. For parts that haven’t been cleaned in a long time or have layers of baked-on carbon, an hour or even two hours of soaking will work wonders. This process loosens the bond between the grime and the metal, making the scrubbing phase exponentially easier.
Step 3: The Scrubbing Phase
After the long soak, drain the water. Retrieve one piece at a time. Start with the grates. Use your non-scratch sponge, dipping it in the leftover soapy water if needed, to scrub away the softened food and grease. For most of the surface, this will come off easily.
For stubborn, burnt-on patches on the grates, create a thick paste of baking soda and a tiny bit of water. Apply it to the problem areas and let it sit for another 15 minutes. Then, use an old toothbrush or the scrubby side of your sponge to work the paste into the residue. The mild abrasion of the baking soda will lift the burnt carbon without damaging the finish. For the most stubborn spots on cast-iron or porcelain grates, you can use coarse salt as an abrasive scrubber. Sprinkle salt on the damp area and scrub vigorously with a halved lemon or a damp cloth. The salt provides the grit, and the lemon acid cuts the grease.
For the burner heads, the toothbrush is your primary tool. Use it to scrub every surface, paying special attention to the area around the flame ports. Get into all the nooks and crannies.
Step 4: The Most Critical Step – Clearing the Ports
This is the step that ensures your stove works correctly after you’ve cleaned it. The small holes or slits around the burner head (the flame ports) can become clogged with food debris or mineral deposits from the cleaning process. If they are clogged, your burner may not light evenly, or the flame may be weak and yellow instead of a strong, clean blue.
Take your straightened paper clip or a needle. Gently poke it into each and every one of these small holes. You are essentially performing minor surgery on your burner. You may feel a small pop as you dislodge a piece of debris. Do this for every single port on every single burner head. Do not use a toothpick for this, as the wood can splinter and break off inside the port, causing a worse clog.
Step 5: Rinse and the Ritual of Thorough Drying
Rinse every single part—grates, caps, and heads—under clean, running water to remove any traces of soap, baking soda, or loosened grime. Now, drying is not optional; it is mandatory for preventing rust and water spots.
Take your clean, dry microfiber cloth and dry each piece meticulously. Pay attention to crevices. For the burner heads, you can even give them a gentle shake and then let them air dry on a dish rack for an hour or two to ensure no moisture is trapped inside, but a thorough towel-dry is the first and most important step.
Part 5: Conquering the Stovetop – A Battle Plan for the Surface
With the heavy parts out for soaking, you have a clear, unobstructed view of the stovetop surface itself. This area is a landscape of potential messes: baked-on spills, greasy films, and crusty deposits around the burner bases.
Step 1: Initial Surface Wipe
Take a dry paper towel or a slightly damp cloth and wipe away all the loose crumbs, dust, and debris that have accumulated. This prevents you from just pushing dirt around when you start the real cleaning.
Step 2: The Baking Soda Poultice
This is the core of the natural cleaning method. Generously sprinkle baking soda over the entire stovetop surface. Don’t be shy. Cover every inch, from the control panel area to the back splash. For areas with heavy, baked-on deposits, mound the baking soda a little thicker.
Now, take your spray bottle filled with plain water and lightly mist the baking soda. You don’t want to flood it, just dampen it enough to turn the powder into a thick, spreadable paste. You can also mix the paste in a separate bowl first and then apply it, but applying it directly often works just fine. Use your fingers or a soft cloth to spread the paste evenly, ensuring the entire surface is coated. This paste will go to work, gently softening and dissolving the greasy film.
Step 3: The Waiting Game
Allow this paste to sit for at least 15-20 minutes. For a stove with years of built-up grime, you can leave it for 30-45 minutes. This is the time for the baking soda’s mild alkalinity to react with the acidic greases and for its moisture to rehydrate burnt-on spills, making them easier to remove.
Step 4: Gentle Scrubbing
After the waiting period, take your non-scratch sponge, dampen it with a little warm water, and begin to scrub the surface in gentle, circular motions. You will feel the paste working as a mild abrasive, lifting the now-loosened grime. For areas around the burner bases where spills are common, use your toothbrush to get into the tight spaces and scrub away any built-up carbon.
Step 5: Activate the Fizz (The Vinegar Reaction)
This is where the magic happens. Fill your spray bottle with white vinegar. Spray it liberally over the areas you’ve just scrubbed with baking soda. The moment the vinegar hits the baking soda, it will erupt in a satisfying, fizzy chemical reaction. This isn’t just for show; this effervescence provides a gentle mechanical action that helps to lift residue out of tiny pores and imperfections in the stovetop’s surface, carrying it away.
Step 6: The Final Wipe-Down
As the fizzing subsides, take a clean, damp microfiber cloth and begin wiping the surface clean. You are now wiping away the reacted mixture of baking soda, vinegar, and the dissolved grime. Rinse your cloth frequently in clean, warm water. You will likely need to go over the entire surface several times to remove all traces of the white, chalky baking soda residue. Keep rinsing and wiping until the cloth comes away clean and the surface looks clear.
Step 7: The Streak-Free Finish
For a final, brilliant shine, especially if you have a stainless steel or enamel surface, take a fresh, dry microfiber cloth and buff the entire stovetop. This removes any last bit of moisture or residue and leaves a clean, polished finish.
Special Care for the Igniters:
Remember those fragile igniters? Now is the time to address them. Do not spray them with vinegar or get baking soda paste all over them. The goal is to clean them gently. Use a dry or slightly damp cotton swab or a soft brush to carefully wipe away any debris or food particles from around the ceramic base and the electrode. You can dip the swab in a tiny amount of vinegar to help dissolve grease, but wring it out well first. The igniter needs to be clean and dry to function correctly.
Part 6: Giving the Control Knobs Their Due
While your knobs have been soaking (as per Part 4, Step 1), they are ready for their individual attention. Remember, you should have removed them earlier.
- Scrub the Crevices: After their soak in warm, soapy water, most of the surface grime will have loosened. Use an old toothbrush to scrub the knobs, paying special attention to the textured areas or any crevices where fingerprints and grease accumulate. The numbers or symbols are often recessed and can hold onto dirt.
- Address Stubborn Marks: If there are sticky or greasy spots that don’t come off with the toothbrush, dip it in a paste of baking soda and water. This gentle abrasive will help lift the residue without scratching the plastic or metal of the knob.
- Rinse and the Essential Drying: Rinse the knobs under clean water to remove all soap and baking soda. Dry them immediately and thoroughly with a soft cloth. This is important to prevent water from seeping into any small openings on the back of the knob, which could lead to problems later. Lay them out to ensure any trapped moisture in the back can evaporate while you finish the rest of the stove.
Part 7: The Grand Reassembly – Putting It All Back Together
With the stovetop gleaming and every component clean, dry, and smelling fresh, it’s time to rebuild your stove. This should be done with care.
- Replace the Control Knobs: First, put the knobs back on. Align them with their valve stems and push them firmly but gently until they are fully seated. If you kept them in order, you can be confident that the markings are correct. If not, you may need to turn on the gas briefly to identify which knob controls which burner.
- Replace the Burner Heads: Place each clean, dry burner head back into its correct position on the stovetop. They should sit flat and snug.
- Replace the Burner Caps: Gently place the correct cap onto each burner head. They should fit perfectly without wobbling.
- Replace the Grates: Finally, lower the heavy grates back into their positions. They are often designed to fit in only one orientation for stability, so ensure they are seated correctly and evenly.
Part 8: The Moment of Truth – Testing Your Work
Before you celebrate, it’s crucial to test your stove. Turn the gas supply valve back on if you turned it off. Then, one by one, turn on each burner. You should hear the igniter clicking, and the burner should light with a strong, even flame. The flame should be primarily blue, with maybe just a tiny tip of orange. A mostly yellow, lazy, or uneven flame indicates that the burner ports might still be clogged or the burner head isn’t seated properly. If this happens, turn off the gas, let the burner cool, and double-check the head and its ports.
Part 9: The Art of Maintenance – Keeping It Clean with Daily Rituals
A deep clean is a wonderful achievement, but the secret to a perpetually beautiful stove is regular, simple maintenance. By adopting a few small habits, you can drastically reduce the need for another Herculean scrubbing session.
- The After-Dinner Wipe-Down: This is the single most effective habit you can form. After dinner, once the stove has cooled down enough to touch comfortably, take a damp microfiber cloth with a single drop of dish soap and give the entire stovetop a quick wipe. This takes two minutes and prevents grease and spills from baking on overnight.
- Address Spills Immediately (When Safe): If something boils over while you’re cooking, don’t let it sit and burn. Once you’ve turned the heat off and the surface is safe to touch (or even if it’s still warm but not scorching hot), wipe it up immediately. A fresh spill wipes away in seconds; a burnt-on spill takes serious effort.
- The Daily Mist: Keep a small spray bottle filled with a mixture of half water and half white vinegar under your sink. Each day, a quick spritz and wipe-down with this solution can keep the surface grease-free and shiny.
- Monthly Check-In: Once a month, do a quick check. Lift the caps and peek underneath. If you see a bit of buildup, give them a quick scrub in the sink with some soapy water. This prevents the kind of deep, carbonized buildup that requires hours of soaking.
Conclusion
Cleaning your gas stove naturally is more than just a chore; it is a practice in mindful home care. It connects you with the simple, powerful chemistry of the natural world and allows you to maintain a clean and healthy cooking environment without introducing unnecessary toxins into your home. By understanding your ingredients—the gentle abrasion of baking soda, the grease-cutting power of vinegar and lemon, and the cleansing action of natural soap—you equip yourself to handle any mess your culinary adventures can create. The process, from the satisfying disassembly to the sparkling reassembly, is a ritual that not only restores your stove to its former glory but also deepens your appreciation for the heart of your home. So, the next time you face a greasy griddle or a burnt-on burner, skip the harsh chemicals and reach for the baking soda. Your stove, your family, and the planet will thank you.
7 thoughts on “How to Clean Gas Stove Naturally at Home”