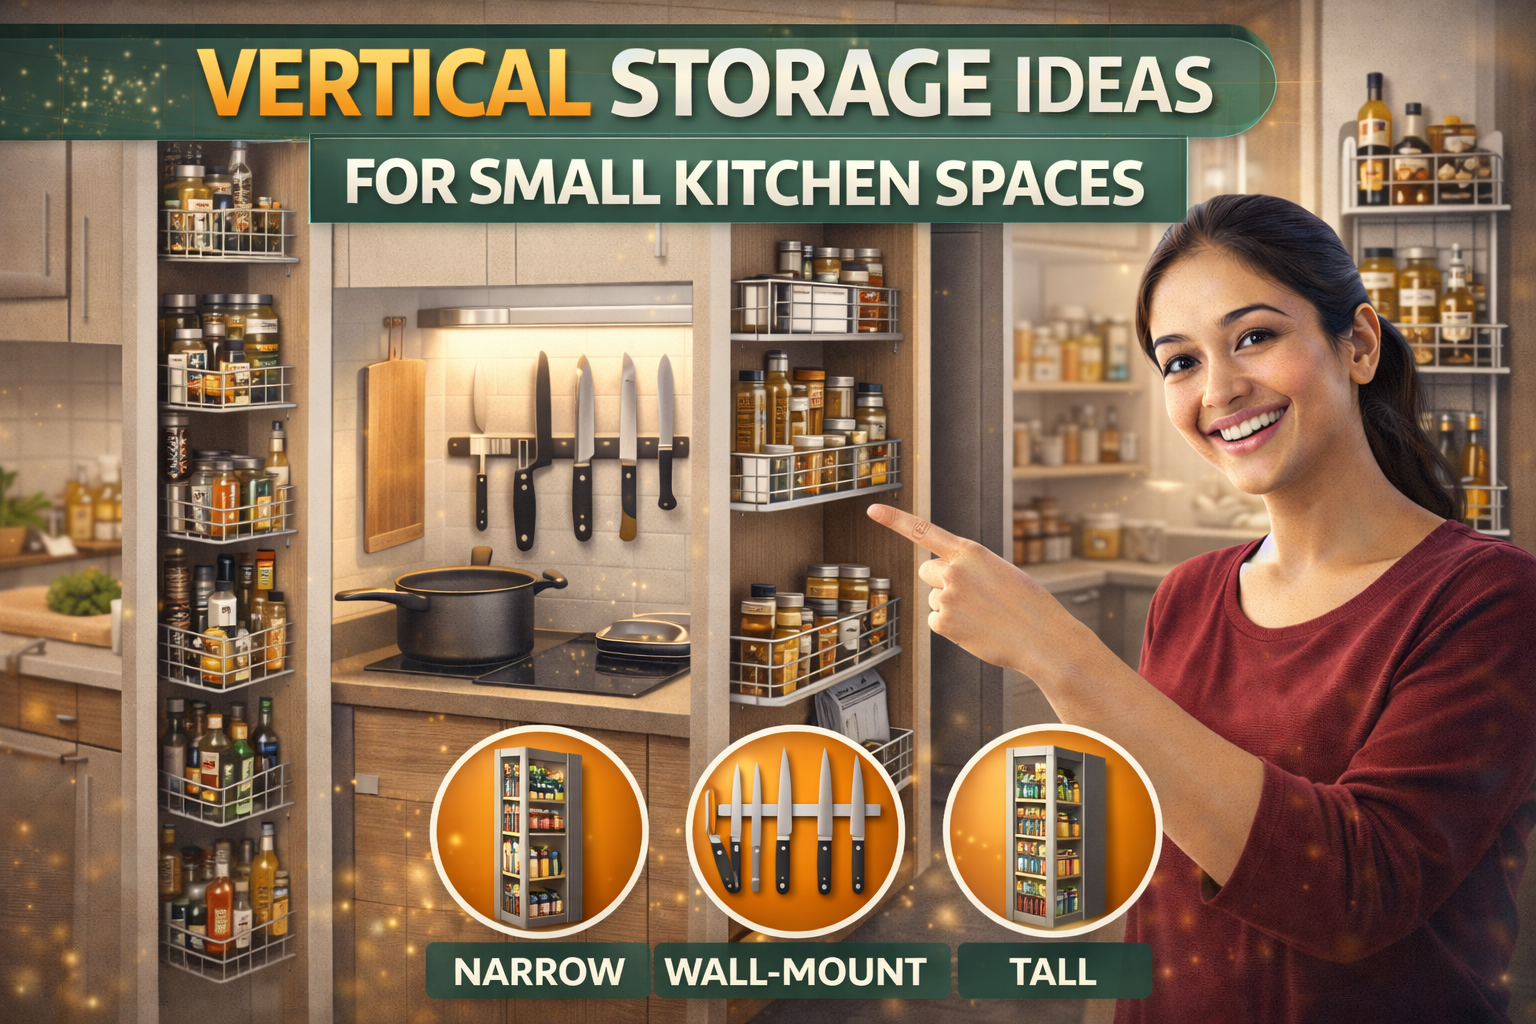
Vertical Storage Ideas for Small Kitchen Spaces : The small kitchen presents a fundamental challenge: too much stuff, not enough space. Countertops disappear under appliances. Cabinets overflow with pots and pans. Drawers jam with utensils. The frustration is real and familiar. But there’s one dimension of your kitchen that is almost certainly underutilized—the vertical plane.
Vertical storage is the secret weapon of small-space dwellers. By thinking upward rather than outward, you can dramatically increase your kitchen’s storage capacity without adding a single square foot of floor space. Walls become storage. The space above cabinets becomes usable. The insides of doors become prime real estate. Even the ceiling can be pressed into service.
The ideas that follow cover every aspect of vertical storage, from simple hooks to sophisticated systems. They work for homeowners and renters alike. They accommodate every kitchen style and every budget. Most importantly, they transform the way you think about your kitchen—from a space defined by its limitations to one defined by its possibilities.
Read More : How to Store Leftover Food Safely
How to Prevent Ants in Kitchen Naturally
How to Get Rid of Kitchen Odor Naturally
How to Keep Vegetables Fresh for Longer in Fridge
How to Clean Burnt Utensils Without Chemicals

1. The Philosophy of Vertical Storage: Why Up Matters
Before diving into specific solutions, it’s worth understanding why vertical storage is so powerful in small kitchens. The concept is simple but profound: floor space is fixed, but vertical space is virtually unlimited .
In a typical kitchen, the walls from counter to ceiling represent dozens of square feet of potential storage that goes completely unused. We mount cabinets, yes, but the space between cabinets and ceiling, the walls themselves, the backsplash area—all of this is storage territory waiting to be claimed .
Vertical storage also works with how we actually use kitchens. Frequently used items need to be accessible, not buried in deep cabinets. Wall-mounted storage puts items at eye level and within easy reach. You can see what you have and grab it instantly .
Vertical storage also reduces counter clutter. By moving items to walls, you free up precious workspace. The counter becomes what it should be—a place for food preparation, not appliance parking .
Finally, vertical storage draws the eye upward, making small kitchens feel larger. When your gaze travels up, the room feels more spacious. Strategic vertical storage enhances this effect .
2. Wall-Mounted Rails: The Versatile Foundation
Rail systems are the workhorses of vertical storage. A single rail mounted horizontally provides a foundation for hanging everything from utensils to pots, and the system can evolve as your needs change .
The basic concept is simple: mount a rail on your backsplash or an empty wall. Choose a length that fits your space and a finish that complements your kitchen—stainless steel for modern, brass for traditional, black for industrial .
Once the rail is installed, you add components: hooks for utensils and tools, shelves for small items, baskets for produce or linens, racks for spices or wine glasses. These components hang from the rail and can be rearranged as needed .
Rail systems are particularly useful near the stove. Mount a short rail beside the stove and hang your most-used tools—spatula, ladle, tongs—on S-hooks. They’ll be accessible without taking up drawer space .
For a cohesive look, choose components from the same manufacturer or in matching finishes. Mixing and matching can work, but consistency creates visual calm .
Installation is straightforward. Most rails come with screws for permanent mounting. For renters, adhesive rails are available, though they won’t hold as much weight. Position rails where they’re accessible but not in the way of cooking activities .
3. Magnetic Strips: Clean, Modern, and Powerful
Magnetic strips offer one of the cleanest, most minimalist vertical storage solutions. These simple strips mount on the wall or backsplash and use powerful magnets to hold metal items securely .
Knife storage is the most common use for magnetic strips. Instead of a bulky knife block that consumes counter space, mount a strip and arrange your knives along the wall. This keeps them accessible, protects the blades, and turns your knives into a design feature .
But magnetic strips can hold much more than knives. Use them for metal utensils—spatulas, ladles, whisks—near the stove. Use them for kitchen shears, bottle openers, and other metal tools. Use them for spice jars with metal lids, or for small pans .
For a cohesive look, choose strips that match your kitchen’s hardware finish. Stainless steel strips work in most kitchens; black strips add drama; brass strips bring warmth .
Consider multiple strips at different heights. A strip at standing height for knives, another lower for children’s utensils, another near the prep area for measuring spoons. Multiple strips create zones for different tools .
Installation is straightforward—most strips come with screws for permanent mounting. For renters, adhesive magnetic strips are available, though they won’t hold as much weight. Position strips where they’re accessible but safe .
4. Open Shelving: Display and Storage Combined
Open shelving has become enormously popular in small kitchens, and for good reason. It provides storage that’s both functional and decorative, turning everyday items into design elements while keeping them accessible .
Installing open shelves is a moderate DIY project. Choose brackets that complement your kitchen style—industrial pipe, ornate scrollwork, simple right angles. Select shelving material that works with your decor: wood for warmth, glass for lightness, metal for industrial edge .
What you place on open shelves matters. This is not storage for rarely used items; it’s display for frequently used beautiful things. Stack everyday dishes neatly. Arrange glassware by size. Display your favorite cookbooks. Add a few plants or ceramic pieces for personality .
Consider the weight of items when installing. Ensure brackets are rated for the load and secured into wall studs. Heavy dishes require substantial support .
Open shelving also forces curation. You can’t hide clutter on open shelves. This visibility encourages you to keep only what you truly need and love—a form of natural selection for your possessions .
5. Pot Racks: Dramatic and Functional
Pots and pans are bulky and difficult to store. Stacked in cabinets, they’re hard to access and can damage each other. Wall-mounted or ceiling-mounted pot racks solve this problem elegantly .
Ceiling-mounted pot racks are common, but wall-mounted versions work well in many kitchens. Choose a rack with multiple arms or bars, and hang pots from S-hooks. Arrange by size and frequency of use .
The key to successful pot rack storage is editing. Don’t hang every pan you own—that creates visual chaos. Hang your most beautiful, most frequently used pots. Store the rest in cabinets .
Consider the visual impact. Copper pots glow against a dark wall. Stainless steel gleams against white. Cast iron adds rustic weight. Your pot rack becomes part of your kitchen’s design .
Ensure the rack is securely mounted into wall studs or ceiling joists. Pots are heavy, and a falling rack is dangerous. Use appropriate hardware and consider professional installation if you’re uncertain .
Position the rack where pots are accessible but not in the way. Near the stove is ideal, but avoid blocking pathways or work areas .
6. Pegboards: Customizable Industrial-Chic
Pegboards have migrated from garages to kitchens, and the transition has been remarkably successful. These perforated panels, fitted with hooks and shelves, offer unlimited flexibility for wall storage .
The beauty of pegboard is its adaptability. As your needs change, you simply move the hooks. Need more space for utensils? Add hooks. Need a small shelf for spices? Add one. The configuration can evolve endlessly .
Pegboards work particularly well for frequently used tools. Mount one near the stove and arrange your cooking utensils for easy access. Mount another near the prep area for measuring cups and spoons .
For a polished look, paint the pegboard to match your walls—it will recede visually, letting your tools take center stage. Or paint it a contrasting color for an industrial-chic statement .
Installation requires spacing the board away from the wall to accommodate hooks. Use furring strips or specialized pegboard mounts. Ensure the board is securely attached, especially if holding heavy items .
Pegboards can also be mounted inside cabinet doors for hidden storage. This keeps tools accessible but out of sight when the door is closed .
7. Cabinet Door Storage: The Hidden Frontier
The insides of cabinet doors represent storage territory that is almost always wasted. Yet these vertical surfaces offer prime real estate for lightweight items that need to be accessed frequently .
The simplest door-mounted solution is an over-door rack that hangs from the top of the cabinet door. These units provide pockets for storing everything from cutting boards and baking sheets to cleaning supplies and food storage containers .
For spice storage, door-mounted racks keep spices visible and accessible while freeing up shelf space. Look for racks with rails that hold jars securely, preventing them from falling when the door opens and closes .
Adhesive hooks provide a no-drill option for lightweight items. Attach them to the inside of cabinet doors to hang measuring cups, oven mitts, kitchen towels, or small utensils .
Wire racks that attach to the inside of the door can hold foil, plastic wrap, parchment paper, and storage bags. These items come in awkward boxes that are difficult to store efficiently on shelves; door mounting keeps them accessible while using otherwise wasted space .
For under-sink cabinets, door-mounted organizers can hold cleaning supplies, sponges, and trash bags. The key is ensuring the door can still close securely—measure carefully before purchasing .
8. Tension Rods: Simple Vertical Dividers
Tension rods, those spring-loaded bars originally designed for curtains, are remarkably useful for vertical storage. A few dollars buys a rod that can serve multiple purposes .
Use tension rods vertically inside cabinets to create dividers for baking sheets, cutting boards, and trays. Place a rod at each end of the cabinet, and slide your sheets between them. This keeps everything upright and accessible, preventing the chaotic slide that happens when these items are stacked horizontally .
Use tension rods vertically in deep cabinets to create compartments for different categories. Multiple rods create multiple sections—canned goods in one, jars in another, bottles in a third .
Use tension rods in the space between refrigerator and wall to create a narrow storage column. Hang lightweight items like kitchen towels or oven mitts from rods mounted vertically .
Use tension rods vertically on open shelving to keep cookbooks upright. Place a rod at each end of a row of books to prevent them from sliding .
The beauty of tension rods is their adjustability and no-tool installation. They can be repositioned instantly as your needs change .
9. Stackable Solutions: Going Up Within Cabinets
Within existing cabinets, vertical space is often wasted. Stackable solutions create multiple layers of storage, effectively doubling your cabinet capacity .
Stackable shelves and risers create two levels of storage within a single cabinet shelf. Place them on lower shelves to store items like mugs or small bowls on the top level, with plates or larger items below. The key is ensuring the riser is stable and that items on both levels remain accessible .
For canned goods, stackable can racks create organized storage that allows you to see everything at once. These racks tip cans forward so you can read labels, and they automatically rotate stock when you add new cans at the back .
For pot lids, stackable lid organizers keep lids separated and accessible. These units stack on top of each other, allowing you to store multiple lids in the same footprint while keeping them organized by size .
For small appliances, consider stacking when possible. Some appliances are designed to stack—a mixer with its attachments stored in the bowl, for example. For others, simply placing smaller appliances on top of larger ones can save space .
10. Above-Cabinet Storage: Utilizing the Top
The space above upper cabinets is often completely ignored. Yet this area offers valuable storage for items you use infrequently .
Baskets or bins on top of cabinets can hold seasonal items, holiday serving pieces, or bulk supplies. Choose containers that look attractive from below, since they’ll be visible .
For a cleaner look, use matching bins that hide the contents. Label them clearly so you know what’s inside without having to climb up .
Consider the height of your ceilings when using above-cabinet storage. If you have very high ceilings, you may need a step stool to access items. Store only rarely used items in these hard-to-reach spots .
Above-cabinet storage can also be decorative. A row of matching baskets, a collection of pottery, or even trailing plants can add visual interest while providing storage .
Ensure that items stored above cabinets are secure and won’t fall. Avoid stacking items precariously. Use bins with lids to contain items .
11. Wall-Mounted Folding Furniture
In very small kitchens, every piece of furniture must earn its keep. Wall-mounted folding furniture provides function when needed and disappears when not .
A wall-mounted drop-leaf table provides dining or prep space that folds flat against the wall when not in use. This is ideal for tiny kitchens where a permanent table would consume precious floor space .
Wall-mounted folding stools or chairs can be hung on hooks when not needed. Keep a couple for occasional guests without sacrificing floor space daily .
A wall-mounted ironing board that folds into a cabinet might seem unrelated, but in a small kitchen, every space-saving measure helps. Look for models that include storage for the iron as well .
When installing folding furniture, ensure the wall mounting is extremely secure. These items bear weight and must not fail. Use appropriate anchors and consider professional installation .
12. Creative Use of Vertical Space
Beyond the standard solutions, creative thinking can unlock even more vertical storage potential. Look at your kitchen with fresh eyes and you’ll see possibilities everywhere .
The side of a cabinet provides vertical surface for adhesive hooks or small racks. Hang pot holders, kitchen towels, or measuring cups here—items you need frequently but that don’t require deep storage .
The space between appliances—the gap between refrigerator and wall, or between stove and cabinet—can accommodate a slim rolling cart. These narrow units are designed specifically for such gaps and can hold spices, oils, or cleaning supplies .
The back of the kitchen door can hold an over-door organizer. Use it for pantry items, cleaning supplies, or kitchen tools. These organizers are inexpensive and require no installation .
The space around a window can be used for hanging planters or small shelves. Herbs grow beautifully in wall-mounted planters, providing fresh flavor and visual appeal .
Even the ceiling can be used for hanging baskets. Hang lightweight baskets from ceiling hooks to store onions, garlic, or potatoes. This keeps them accessible while adding rustic charm .
| Vertical Storage Solution | Best For | Installation Required | Space Utilized |
|---|---|---|---|
| Wall-Mounted Rails | Utensils, tools, towels | Moderate | Wall space |
| Magnetic Strips | Knives, metal utensils | Easy | Wall or backsplash |
| Open Shelving | Dishes, glassware, cookbooks | Moderate | Wall space |
| Pot Racks | Pots and pans | Moderate to Difficult | Wall or ceiling |
| Pegboards | Utensils, tools, small items | Moderate | Wall space |
| Cabinet Door Storage | Spices, cleaning supplies, wraps | Easy | Inside cabinet doors |
| Tension Rods | Dividers for sheets, trays | None | Inside cabinets |
| Stackable Solutions | Cans, lids, small items | None | Vertical cabinet space |
| Above-Cabinet Storage | Rarely used items | None | Above cabinets |
| Wall-Mounted Furniture | Dining, seating, prep space | Difficult | Wall space |
| Creative Spaces | Various | Varies | Side of cabinets, between appliances |
The Vertical Storage Mindset
Embracing vertical storage requires a shift in how you think about your kitchen. Instead of seeing empty walls, you see potential storage. Instead of ignoring the space above cabinets, you see opportunity. Instead of accepting clutter, you see solutions .
This mindset extends beyond storage to how you think about your kitchen overall. A small kitchen is not a limitation but a challenge—an invitation to be creative, to think differently, to find solutions that larger kitchens don’t require .
Vertical storage also teaches you about curation. When space is limited, you can’t keep everything. Vertical storage forces you to choose what truly deserves a place on your walls. This intentionality makes your kitchen more personal and more functional .
Implementation Strategy
With so many possible solutions, it’s tempting to try them all at once. A more strategic approach yields better results. Start by identifying your biggest storage pain points. Is it the cluttered counter? The inaccessible pots? The lost spices ?
Choose one or two vertical solutions that address your primary frustrations. Implement them fully and live with the changes for a while. Notice what works and what doesn’t. Adjust as needed before adding more .
As you implement each solution, consider whether it truly improves your storage or simply rearranges clutter. The goal is not to fill every wall but to create a system where everything has a logical home and is accessible when needed .
For renters, focus on removable solutions. Tension rods, adhesive hooks, and freestanding units can provide vertical storage without permanent installation. Always check your lease and get permission when required .
Conclusion : Vertical Storage Ideas for Small Kitchen Spaces
Vertical storage transforms small kitchens from frustrating to functional. By utilizing walls, cabinet doors, and even ceilings, you can dramatically increase your storage capacity without adding floor space. The ideas in this guide—from rail systems and magnetic strips to open shelving and pot racks—provide a toolkit for making the most of every vertical inch .
Start with what frustrates you most. Choose a vertical solution that addresses that frustration and implement it thoughtfully. Experience the satisfaction of reclaimed space, then build from there. Gradually, your kitchen will transform from a space defined by its limitations to one defined by its possibilities .
The walls of your kitchen are waiting. They have potential you’ve never tapped—space for storage, for display, for making your kitchen work better. With the ideas in this guide, you can unlock that potential and create a kitchen that’s not just more organized, but more beautiful, more functional, and more truly yours .
8 thoughts on “Vertical Storage Ideas for Small Kitchen Spaces”