How to Organize Kitchen Pantry Step by Step : The kitchen pantry. It begins with good intentions—a place for food, organized and accessible. But over time, it becomes something else entirely. Cans accumulate at the back, forgotten until their expiration dates have long passed. Boxes of pasta multiply mysteriously. Spices migrate from their designated spots. What was once order becomes chaos, and what should be a source of nourishment becomes a source of frustration.
An organized pantry is not merely aesthetic. It saves money by preventing duplicate purchases. It reduces food waste by keeping items visible and accessible. It makes cooking easier by allowing you to find what you need quickly. And it brings a sense of calm to the kitchen—one less thing to stress about in a busy life.
The process of organizing a pantry can seem overwhelming, especially if yours has descended into chaos. But like any large project, it becomes manageable when broken into steps. This guide takes you through the entire process, from initial assessment to final maintenance, with detailed instructions for each stage. Whether you have a walk-in pantry, a reach-in closet, or a few shelves in a cabinet, these principles apply.
Read More : How to Declutter Your Kitchen Fast
Vertical Storage Ideas for Small Kitchen Spaces
Simple Pantry Organization Tips for Families
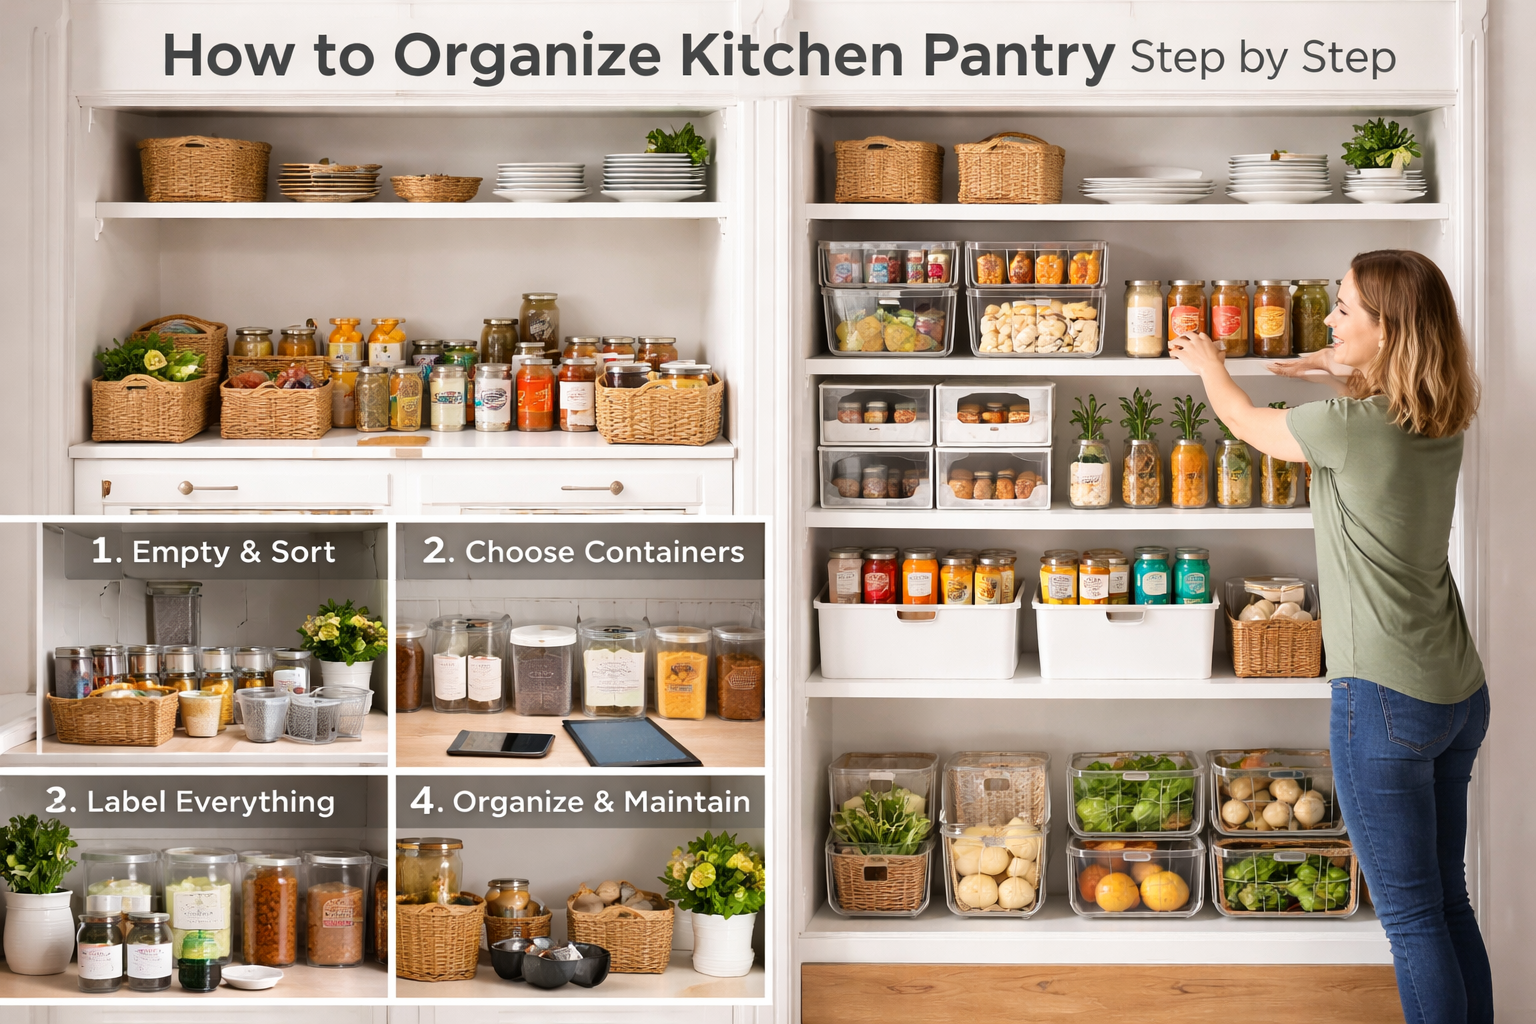
1. Assessment: Understanding What You’re Working With
Before you touch a single item, before you open the pantry door, take time to assess what you’re dealing with. This assessment will inform every decision that follows .
Start by looking at your pantry space objectively. Measure the dimensions—height, width, depth of each shelf. Note any quirks: awkward corners, sloped ceilings, pipes or vents that intrude. Sketch a rough diagram, or simply take notes. This information will be essential when you shop for organizing products .
Now consider how you use your pantry. Do you cook mostly from scratch, requiring bulk ingredients like flour and rice? Or do you rely more on prepared foods and snacks? Do you have dietary restrictions that require specialty items? Do you buy in bulk at warehouse stores, or shop weekly for smaller quantities ?
Think about who uses the pantry. If children need access to snacks, lower shelves should accommodate them. If you have mobility issues, frequently used items should be at accessible heights. The pantry should work for everyone who uses it .
Finally, consider your goals. What do you want from your organized pantry? Maximum capacity? Easy visibility? Aesthetic appeal? Quick access to frequently used items? Your goals will guide your decisions about products and systems .
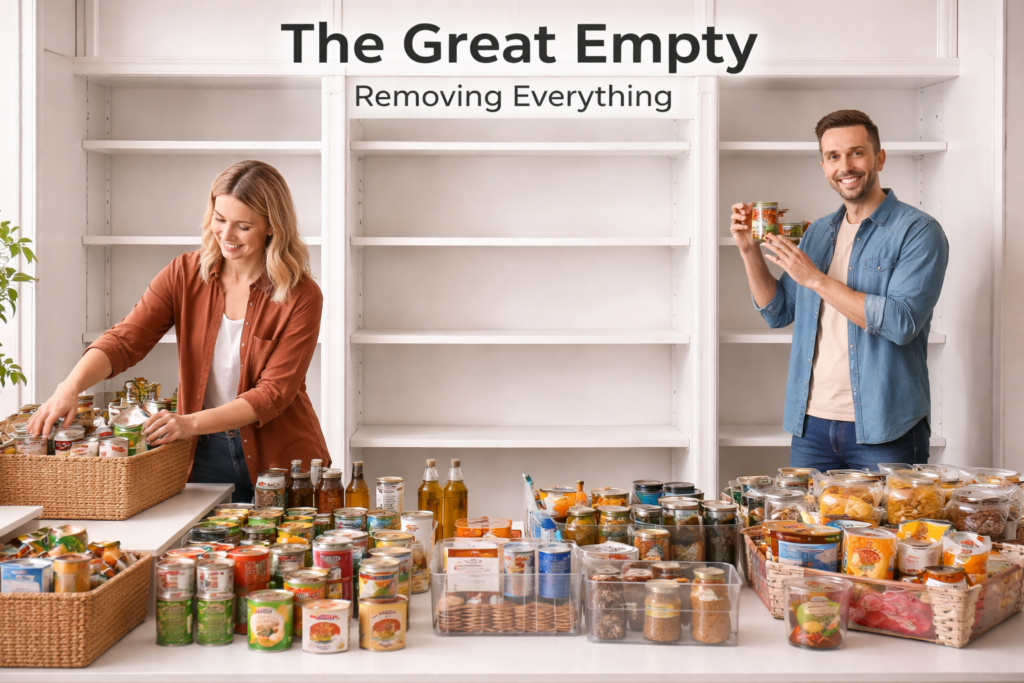
2. The Great Empty: Removing Everything
With assessment complete, the real work begins. Empty your pantry completely. Every item, from every shelf, must come out. This is uncomfortable—it creates a mess and forces you to confront the full scope of your possessions—but it is absolutely necessary .
As you remove items, place them on your kitchen counter, table, or floor—wherever you have space. Group similar items together as you go: all canned goods in one area, all pasta in another, all baking supplies together. This preliminary grouping will make the next steps easier .
Clean the empty pantry thoroughly. Vacuum or sweep crumbs from every corner. Wipe down shelves with a gentle cleaner. If you have removable shelves, take them out and clean them separately. A clean start makes the organization that follows feel fresh and intentional .
While the pantry dries, take stock of what you’ve removed. You’ll likely be surprised by the quantity and variety. This visual inventory is revealing—it shows you what you actually have, not what you thought you had .
3. The Purge: Letting Go of What You Don’t Need
Now comes the difficult but essential step: purging what doesn’t belong. With everything visible before you, you can make intentional decisions about what to keep .
Start with expiration dates. Check every package, every can, every jar. Anything past its expiration date goes in the trash. Be ruthless—expired food has no place in an organized pantry. This alone often eliminates a surprising amount .
Next, evaluate items that are still within date but that you know you won’t use. That specialty ingredient you bought for a recipe you’ll never make again? Donate it if unopened, discard if opened. The fancy vinegar that seemed like a good idea but you don’t actually like? Let it go .
Consider duplicates. How many bottles of olive oil do you really need? How many bags of rice? Keep what you’ll reasonably use before it expires; donate or give away the rest .
For items that are still good but that you have too much of, consider whether you have space to store them properly. If not, it’s better to let them go now than to have them clutter your newly organized space .
Finally, evaluate packaging. Some items come in bulky boxes that take up unnecessary space. You may choose to transfer these to more efficient containers later, but for now, decide what you’re keeping and set it aside .
4. Categorization: Grouping Like with Like
With your kept items spread before you, it’s time to organize them into categories. This is the foundation of a functional pantry—when similar items live together, you always know where to look .
Common pantry categories include:
- Baking supplies: flour, sugar, baking soda, chocolate chips, extracts
- Grains: rice, pasta, quinoa, oats, couscous
- Canned goods: vegetables, fruits, beans, soups, tomatoes
- Oils and vinegars: olive oil, vegetable oil, vinegar, cooking spray
- Spices and seasonings: all your jars and packets
- Snacks: chips, crackers, granola bars, nuts, dried fruit
- Breakfast items: cereal, oatmeal, pancake mix, syrup
- Condiments and sauces: ketchup, mustard, mayo, soy sauce, hot sauce
- Beverages: coffee, tea, hot chocolate, drink mixes
- International ingredients: items specific to cuisines you cook regularly
Within each category, you may want subcategories. For example, within canned goods, group vegetables together, fruits together, beans together. This level of organization makes finding specific items even easier .
As you categorize, note any storage issues that become apparent. Do you have too many items in a category? That might indicate a need to adjust your shopping habits. Do certain items come in awkward packaging? They might be candidates for container transfer .
5. Strategic Planning: Designing Your Pantry Layout
Now comes the strategic thinking. With categories established, you need to decide where each category will live in your pantry. This layout should be based on how you actually use the space .
The golden rule of pantry organization is frequency of use. Items you use daily or weekly deserve the most accessible spots—typically at eye level on middle shelves. Items you use occasionally can go on higher or lower shelves. Items you use rarely—holiday baking supplies, specialty ingredients—can go in the hardest-to-reach places .
Consider also the weight of items. Heavy items—canned goods, large bottles—should go on lower shelves where they’re easier to lift and less dangerous if they fall. Lightweight items—snacks, boxes of pasta—can go higher .
Think about workflow. If you always bake on the counter nearest the pantry, keep baking supplies together and easily accessible. If you make coffee first thing every morning, keep coffee and tea at the front of an accessible shelf .
If children use the pantry, designate lower shelves for their snacks and lunch items. This empowers them to get their own food while keeping them out of areas with heavy or dangerous items .
Consider creating zones within your pantry. A breakfast zone with cereal, oatmeal, and pancake mix. A baking zone with flour, sugar, and extracts. A snack zone for easy grabbing. These zones make the pantry intuitive to use .
6. Container Selection: The Beauty of Uniformity
One of the most transformative steps in pantry organization is transferring dry goods into uniform containers. This serves multiple purposes: it protects food from pests and moisture, it extends freshness, it allows you to see at a glance how much you have, and it creates visual calm .
Start with the basics: flour, sugar, rice, pasta, oats, coffee, tea. Choose containers that are clear so you can see contents, and square or rectangular so they pack efficiently without wasted space between round containers. Glass is beautiful and doesn’t absorb odors; plastic is lightweight and unbreakable; both work .
For each container, consider the quantity you typically buy and use. A container that’s too small will require frequent refilling; one that’s too large wastes space. Measure your shelf depths before purchasing to ensure containers will fit .
Label each container clearly. A label maker creates a uniform look, but simple chalk labels or masking tape work too. Include the contents and, if you’re organized, the date of purchase or transfer. This prevents the “what is this brown powder?” mystery that happens when containers go unlabeled .
For spices, uniform jars with labels visible from above transform the frustrating search for the right spice into a quick visual scan. Arrange spices alphabetically or by cuisine—whatever makes sense to you. The key is consistency and visibility .
For items that stay in their original packaging—canned goods, boxed items—consider using clear bins to corral them. Bins keep similar items together and prevent the chaos of items sliding around on shelves .
7. Shelving and Storage Solutions
With your categories planned and containers selected, consider whether you need additional shelving or storage solutions to maximize your space .
If your pantry has adjustable shelves, take advantage of this flexibility. Adjust shelf heights to accommodate your tallest containers while minimizing wasted vertical space. You may need different heights for different sections—taller for cereal boxes, shorter for spice jars .
For pantries with fixed shelves, consider adding under-shelf baskets. These attach to the shelf above and create additional storage for lightweight items. Use them for spice packets, tea bags, or small snacks .
Lazy Susans are essential for corner shelves or deep cabinets. Place one in any corner to make items accessible—simply spin to bring what you need forward. Two-tier lazy Susans double your storage in the same footprint .
Pull-out drawers or baskets transform deep shelves. Instead of reaching into the depths, you pull the entire drawer forward. This is particularly valuable for lower shelves where bending and reaching combine to create maximum frustration .
Door-mounted racks utilize the inside of the pantry door. Use them for spices, condiments, or small items that would otherwise get lost on shelves. Just ensure the door can still close securely .
8. The Assembly: Putting It All Together
With all preparations complete, it’s time to assemble your organized pantry. This is the exciting part—watching your plan become reality .
Start by placing your largest items and containers. These establish the foundation and help you see how everything will fit. Adjust as needed—if something doesn’t fit as planned, be flexible and find another spot .
Work category by category, placing each group in its designated zone. As you place items, consider the frequency principle within each category. Within the baking zone, for example, flour and sugar (used frequently) should be at the front; specialty extracts (used less often) can be at the back .
Use bins and baskets to keep categories contained. Place all canned vegetables in one bin, all canned beans in another. This prevents items from sliding around and makes it easy to pull an entire category forward when needed .
As you work, step back periodically to assess. Does the layout feel logical? Are frequently used items truly accessible? Is there any wasted space that could be better utilized? Make adjustments as you go .
When everything is placed, take a moment to appreciate your work. Open the door and admire the order. This satisfaction is the reward for your effort—and it will motivate you to maintain the system .
9. Labeling: The Final Touch
Labels are not just for aesthetics—they’re for maintenance. When everything is labeled, everyone in the household knows where things belong. This makes it more likely that items will be returned to their proper places .
Label shelves to indicate what belongs in each zone. A simple label on the shelf edge—”Baking,” “Grains,” “Canned Goods”—guides users and makes restocking intuitive .
Label containers clearly with their contents. For clear containers, a simple label on the front or top works. For opaque containers, labeling is essential .
Consider using a label maker for a uniform look. These devices create crisp, professional labels that adhere well and last. If you don’t have a label maker, chalk labels or masking tape with permanent marker work fine .
For bins and baskets, label the front so you can see at a glance what’s inside. This is particularly useful for bins on higher or lower shelves where you can’t see the contents .
10. The First Restock: Shopping with Intention
With your pantry organized, your first shopping trip becomes an opportunity to maintain the system. Shop with intention, considering what you actually need rather than impulse-buying .
Before shopping, take inventory of what you have. Your organized pantry makes this easy—you can see at a glance what’s running low. Make a list based on actual needs, not assumptions .
When you return from shopping, resist the temptation to simply shove items into the pantry. Take time to put each item in its designated place. This five-minute investment preserves your organization .
As you restock, practice the “first in, first out” principle. When adding new items, place them behind existing ones. This ensures older items get used before they expire .
If you find that certain categories consistently overflow their designated space, consider whether you’re buying too much of those items or whether you need to allocate more space to them .
11. Maintenance Systems: Keeping Order Over Time
The best-organized pantry will return to chaos without maintenance systems. The key is building habits that make tidying effortless .
The first habit is the daily tidy. Each time you use the pantry, take a moment to return items to their proper places. That box of pasta that ended up on the wrong shelf? Put it back. That bag of snacks left on the counter? Return it. This daily attention prevents gradual drift .
The second habit is the weekly check. Once a week, open the pantry and assess. Is everything in its place? Are there any areas that need attention? Have any items accumulated that don’t belong? This weekly check catches problems before they become overwhelming .
The third habit is the monthly inventory. Once a month, take a few minutes to check expiration dates and note what’s running low. This prevents the accumulation of expired items and ensures you’re never caught without essentials .
The fourth habit is the seasonal reset. Every few months, do a quick refresh. Pull everything out, wipe down shelves, and reassess. Are your categories still working? Do you need to adjust anything? This seasonal reset keeps your pantry functioning optimally .
12. Troubleshooting Common Pantry Problems
Even with the best systems, pantry problems can arise. Here’s how to address common issues .
If you’re running out of space, reassess what you’re keeping. Are you holding onto items you don’t actually use? Consider a mini-purge. Are there items that could be stored elsewhere—overflow canned goods in a basement shelf, rarely used appliances in another cabinet ?
If items keep getting lost, your categorization may need refinement. Are similar items truly grouped together? Are labels clear and visible? Sometimes the solution is smaller, more specific categories .
If family members aren’t maintaining the system, involve them in the process. Explain the logic behind your organization. Show them where things belong. Make it easy for them to participate—clear labels help .
If you’re buying duplicates of items you already have, your visibility may be the problem. Can you see everything at a glance? If not, consider clear containers, better lighting, or removing items that block your view .
| Step | Purpose | Key Actions | Time Required |
|---|---|---|---|
| Assessment | Understand your space and needs | Measure, observe usage, set goals | 30 minutes |
| The Great Empty | See everything you have | Remove all items, clean thoroughly | 1-2 hours |
| The Purge | Eliminate what you don’t need | Check expiration, evaluate usefulness, donate | 1-2 hours |
| Categorization | Group similar items | Create categories and subcategories | 1 hour |
| Strategic Planning | Design your layout | Consider frequency, weight, workflow | 1 hour |
| Container Selection | Choose storage products | Measure, purchase containers and bins | Varies |
| Shelving Solutions | Maximize space | Add organizers, lazy susans, pull-outs | Varies |
| The Assembly | Put it all together | Place items by category and frequency | 2-3 hours |
| Labeling | Make maintenance possible | Label shelves, containers, bins | 1 hour |
| First Restock | Shop with intention | Inventory, list, intentional purchasing | Ongoing |
| Maintenance Systems | Keep order over time | Daily tidy, weekly check, monthly inventory | 10 minutes daily |
| Troubleshooting | Address problems | Reassess, adjust, involve family | As needed |
The Psychology of an Organized Pantry
The benefits of an organized pantry extend far beyond the practical. There is a psychological dimension to order that affects how we feel about our kitchens and, by extension, about cooking and eating .
A chaotic pantry creates friction. Every time you need something, you must overcome that friction—searching, digging, moving things aside. This friction accumulates over days and weeks, subtly discouraging cooking. You might not consciously decide to cook less because your pantry is messy, but the accumulated frustration makes takeout more appealing .
An organized pantry, by contrast, creates flow. Everything has a place, everything is accessible, nothing obstructs anything else. Cooking becomes easier, more pleasant, more frequent. The time and energy invested in organization pay dividends every time you open that door .
There is also a satisfaction in order itself—the pleasure of opening the pantry and seeing everything neatly arranged, of knowing exactly where everything is, of having a space that reflects your values and supports your life. This satisfaction is not trivial; it contributes to your overall sense of well-being and your relationship with your home .
The Environmental Impact
An organized pantry is also an environmentally friendly pantry. When you can see what you have, you’re less likely to buy duplicates. When items are accessible, you’re more likely to use them before they expire. When you know your inventory, you can shop with intention, reducing food waste .
Food waste is a significant environmental problem. According to the USDA, Americans waste between 30-40 percent of the food supply. An organized pantry directly combats this waste by keeping food visible and accessible, reminding you to use what you have before it spoils .
The containers you choose also have environmental implications. Glass containers are endlessly recyclable and don’t leach chemicals. Reusable bins and baskets eliminate the need for single-use packaging. By investing in quality storage solutions, you reduce your reliance on disposable options .
Conclusion : How to Organize Kitchen Pantry Step by Step
Organizing your kitchen pantry step by step is a project that rewards effort with lasting benefits. It saves money, reduces waste, makes cooking easier, and brings a sense of calm to your kitchen. The process requires time and intentionality, but the result is a space that works for you rather than against you.
Start with assessment—understand your space and your needs. Empty everything, purge ruthlessly, categorize thoughtfully. Plan your layout based on how you actually use the pantry. Choose containers that maximize space and create visual calm. Assemble with intention, label clearly, and shop mindfully. Maintain your system with daily, weekly, monthly, and seasonal habits.
The result is not just an organized pantry but a transformed relationship with food. When you can see what you have, you cook more and waste less. When everything has a home, shopping becomes intentional rather than reactive. When your pantry supports rather than hinders, the entire cooking process becomes a pleasure.
Your pantry awaits. The process may seem daunting, but like any large project, it becomes manageable one step at a time. Start today. Open that door, take everything out, and begin the journey toward an organized pantry. Your future self will thank you every time you cook.