Minimalist Kitchen Organization Guide for Beginners : The minimalist kitchen is not about emptiness. It is not about stark white rooms with nothing on the counters and cupboards that contain only the barest essentials. True minimalism in the kitchen is about intentionality—keeping only what you use and love, organizing it thoughtfully, and creating a space that supports rather than hinders your cooking life.
For beginners, the prospect of minimalist organization can feel overwhelming. The kitchen is often the most cluttered room in the house, filled with gadgets we never use, duplicates we forgot we owned, and items we keep只是因为习惯 rather than need. The idea of paring down to essentials seems daunting, even impossible.
But minimalist kitchen organization is not about deprivation. It is about clarity. It is about opening a cabinet and seeing exactly what’s there, not a jumble of items blocking each other. It is about reaching for a tool and finding it immediately, not after digging through a drawer. It is about cooking without the frustration of searching, shifting, and working around clutter.
This guide is designed for absolute beginners. It assumes you are starting from a place of chaos and want to move toward order. It breaks the process into manageable steps, from the initial mindset shift to the final maintenance systems. It acknowledges that minimalism is a journey, not a destination, and that progress matters more than perfection.
Read More : How to Declutter Your Kitchen Fast
Vertical Storage Ideas for Small Kitchen Spaces
Simple Pantry Organization Tips for Families
1. Understanding Kitchen Minimalism: Mindset First
Before you touch a single item, before you open a single cabinet, you must understand what minimalism means in the context of a kitchen. This understanding will guide every decision you make and prevent the common pitfall of simply rearranging clutter rather than actually reducing it .
Minimalism in the kitchen is not about owning as little as possible. It is about owning the right things—the things you actually use, the things that bring you joy, the things that serve a purpose in your cooking life. A minimalist kitchen might have fifty items or five hundred; the number matters less than the intentionality behind each one .
The minimalist mindset asks different questions about possessions. Instead of “Could I use this someday?” it asks “Do I use this regularly?” Instead of “This was expensive, so I should keep it” it asks “Does this item earn its place in my limited space?” Instead of “What if I need this?” it asks “If I needed this, could I borrow or replace it?” .
This shift in questioning is fundamental. It moves you from accumulation based on fear—fear of needing something and not having it—to curation based on actual use. You begin to see your kitchen not as a storage space for potential needs but as a workspace for actual cooking .
The minimalist mindset also embraces the reality of limited space. In a small kitchen, every item competes for space. Keeping one thing means not keeping another. This forces prioritization. You learn to choose the best spatula, not all the spatulas. You learn to keep the pan you actually use, not the set you bought hoping to become a better cook .

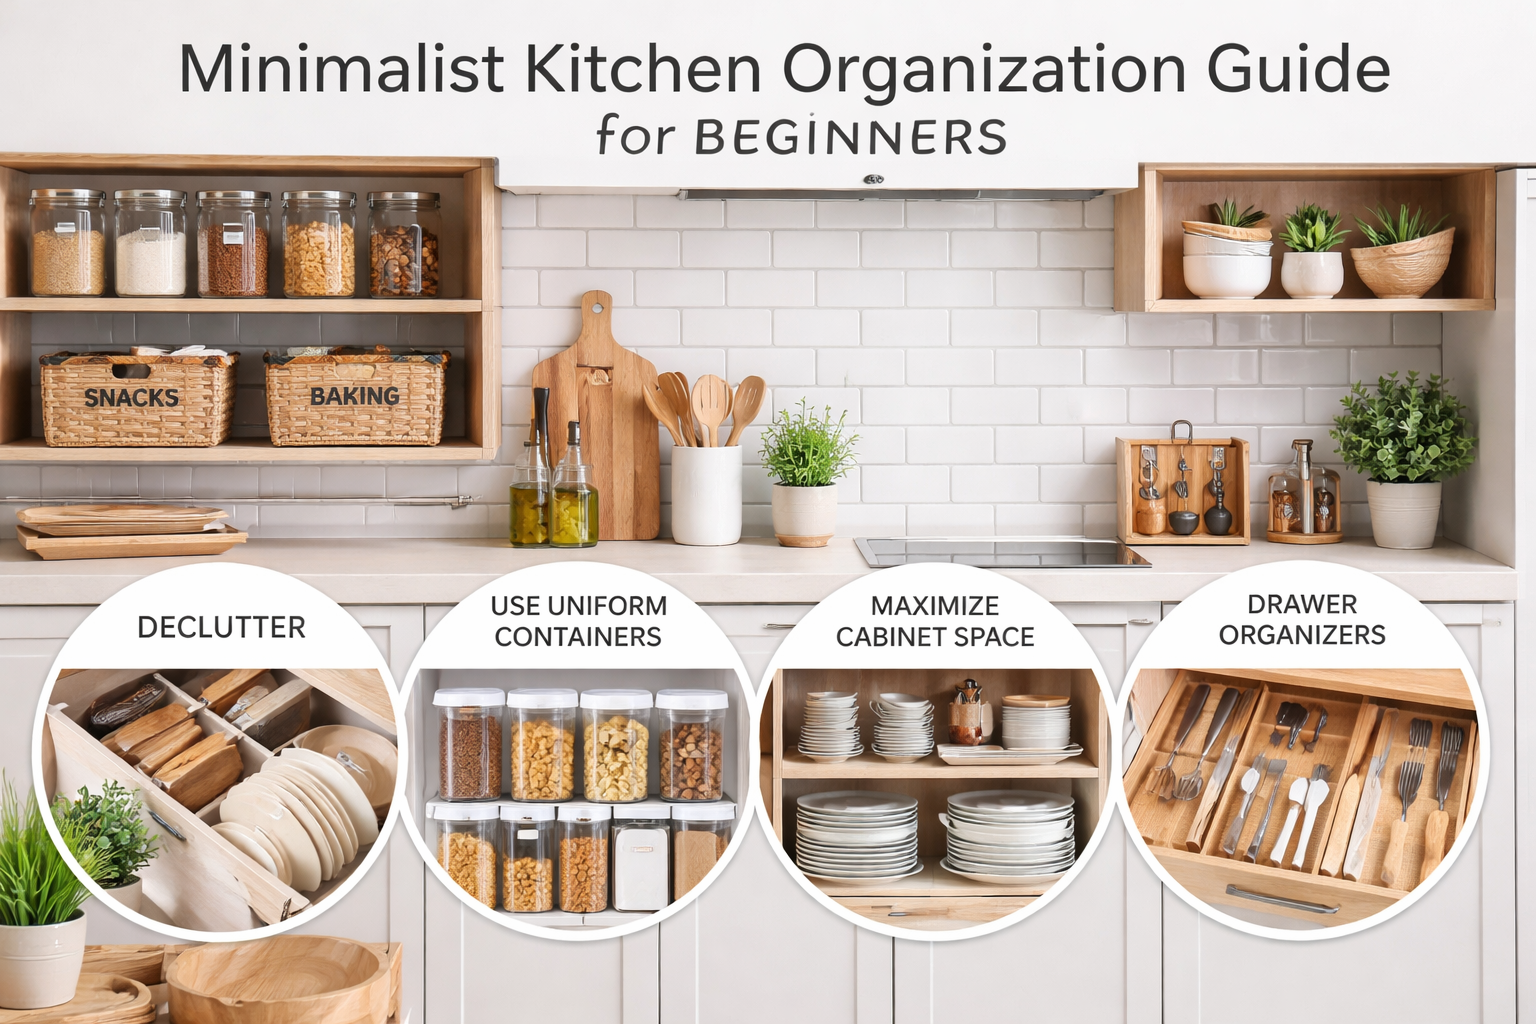
2. The Great Purge: Where Beginners Start
With mindset established, the actual work begins. The first step in any minimalist kitchen organization is the purge—removing everything that doesn’t belong. This is the most difficult step for beginners, but it is also the most essential. Without it, you’re simply organizing clutter .
Set aside a block of time—a full day is ideal, though a weekend might be necessary. Clear your schedule and prepare to be uncomfortable. The purge is emotionally challenging because it forces you to confront your relationship with possessions. This is normal and expected .
Start with one category, not one cabinet. The category method is more effective because it shows you the full extent of your duplicates and helps you make better decisions. Begin with an easy category—utensils, perhaps, or storage containers. Empty every utensil drawer and container cabinet onto the counter. See everything at once .
Now evaluate each item. Hold it in your hands and ask the minimalist questions: Do I use this regularly? Do I love this? Does this serve a purpose in my cooking life? If the answer to any question is no, the item goes into a discard pile. Be honest with yourself. That avocado slicer you bought on impulse and never used? It goes. The third spatula when you only need one? It goes .
For items you use but only occasionally—holiday serving pieces, specialty baking equipment—set them aside for later decisions. They may earn a place in less accessible storage, but they don’t deserve prime real estate .
Work through every category: pots and pans, bakeware, dishes, glassware, food storage, small appliances, pantry items, cleaning supplies. Each category gets the same treatment: empty everything, evaluate each item, keep only what you actually use .
The discard pile should be substantial. If you’re doing this correctly, you’ll be shocked by how much you’ve accumulated. This is good. It means you’re making progress. Donate usable items, recycle what you can, and discard the rest. The goal is to reach a point where everything that remains earns its place .
3. The One-In, One-Out Rule: Preventing Reaccumulation
The purge is just the beginning. Without systems to prevent reaccumulation, your kitchen will slowly return to its cluttered state. The one-in, one-out rule is the most effective prevention system .
The rule is simple: whenever you bring a new item into your kitchen, one similar item must leave. Buy a new spatula? Donate an old one. Receive a set of dishes as a gift? Remove an existing set. This forces you to constantly evaluate what you actually need and prevents the gradual accumulation that leads to clutter .
This rule applies to everything: tools, gadgets, dishes, storage containers, small appliances. It’s particularly important for items that tend to multiply—takeout containers, reusable bags, coffee mugs. By maintaining a constant inventory, you ensure that your kitchen never again reaches the state of chaos that required this purge .
The one-in, one-out rule works best when combined with designated homes for everything. When every item has a place, it’s immediately obvious when that place is full. If the utensil drawer won’t close, something has to go before anything new can come in .
For items you genuinely need but don’t have space for, the rule forces you to evaluate whether you’re willing to give up something else to accommodate the new item. This thoughtful approach to acquisition prevents the mindless accumulation that fills kitchens with things you don’t actually need .
4. Zone Your Kitchen: Grouping by Function
With your reduced possessions laid out before you, the next step is deciding where everything belongs. The most efficient kitchens are organized by zone—areas dedicated to specific functions, with all related items stored together .
Consider how you actually use your kitchen. Where do you prepare food? That area should house cutting boards, knives, mixing bowls, and food preparation tools. Where do you cook? That zone should contain pots, pans, spatulas, and cooking utensils. Where do you plate and serve? That’s where dishes, serving pieces, and everyday flatware belong .
The cooking zone, around the stove, should contain the items you use while cooking: oils and spices, cooking utensils, pots and pans. These items need to be within arm’s reach of the stove—having to cross the kitchen for salt or a spatula disrupts the cooking flow .
The preparation zone, typically near the sink or on your main counter, should hold cutting boards, knives, mixing bowls, measuring cups, and food preparation tools. This is where ingredients become meals, and having everything at hand makes the process smoother .
The storage zone houses dry goods, canned items, and ingredients. This can be separate from preparation and cooking zones—in fact, it often works better if it is, since you can gather ingredients before you begin cooking without interfering with the active cooking area .
The cleaning zone, under the sink and perhaps in adjacent cabinets, contains dish soap, sponges, trash bags, and cleaning supplies. These items need to be accessible but not in the way of food preparation .
Within each zone, group similar items together. All baking sheets in one spot, all mixing bowls nested together, all spices in a designated area. This makes finding what you need intuitive—you know where to look because you know how things are grouped .
5. The Golden Rule of Placement: Accessibility Based on Frequency
Within each zone, items should be placed according to how often you use them. This simple principle—store everyday items in the most accessible locations, occasional items higher or lower—should guide all your organization decisions .
Everyday items—those you use daily or weekly—deserve prime real estate. In upper cabinets, this means eye-level shelves. In base cabinets, this means the front of pull-out shelves or the easiest-to-reach spots. On counters, this means the space closest to where you use them .
Weekly items—those you use a few times a week but not every day—can live in slightly less accessible spots. Higher shelves in upper cabinets, deeper in base cabinets, still within reach but not in the way of daily items .
Monthly or occasional items—specialty bakeware, holiday dishes, the roasting pan you use at Thanksgiving—can go in the hardest-to-reach places. High upper cabinets, deep corner cabinets, the back of under-sink storage. These items don’t need prime real estate because you access them infrequently .
This frequency-based placement serves two purposes. First, it makes your kitchen more efficient—you’re not reaching over occasional items to access daily ones. Second, it serves as an ongoing reminder of what you actually use. If you find yourself constantly reaching into the “occasional” zone for a particular item, it’s actually a daily item and should move .
6. Clear Counters: The Visual Impact of Minimalism
In a minimalist kitchen, counters are not storage. They are workspaces. The goal is to keep them as clear as possible, with only the items you use multiple times daily earning a permanent place .
Start by removing everything from your counters. Every appliance, every utensil holder, every jar of utensils. Clean the counters thoroughly. Now, one by one, consider each item: Do I use this every day? Does it need to live on the counter, or could it live in a cabinet and be taken out when needed ?
For most people, a few items earn counter space: the coffee maker, perhaps a toaster, maybe a knife block. Everything else should go in cabinets. If you use an appliance daily—a blender for smoothies, a kettle for tea—it can stay. If you use it weekly, it should live in a cabinet and come out when needed .
The visual impact of clear counters is profound. The kitchen immediately feels larger, calmer, more intentional. You can actually see the workspace. Cleaning becomes easier because there’s nothing to move. Cooking becomes more pleasant because you’re not working around obstacles .
For items that must stay on the counter, consider their visual impact. Choose appliances in colors that coordinate with your kitchen. Group them together rather than scattering them. Create a designated appliance zone where they live together, minimizing visual chaos .
7. Container Consistency: The Beauty of Uniformity
One of the most transformative steps in minimalist kitchen organization is transferring dry goods into uniform containers. This serves multiple purposes: it protects food from pests and moisture, it extends freshness, it allows you to see at a glance how much you have, and it creates visual calm .
Start with the basics: flour, sugar, rice, pasta, oats, coffee, tea. Choose containers that are clear so you can see contents, and square or rectangular so they pack efficiently without wasted space between round containers. Glass is beautiful and doesn’t absorb odors; plastic is lightweight and unbreakable; both work .
Label each container clearly. A label maker creates a uniform look, but simple chalk labels or masking tape work too. Include the contents and, if you’re organized, the date of purchase or transfer. This prevents the “what is this brown powder?” mystery that happens when containers go unlabeled .
For spices, uniform jars with labels visible from above transform the frustrating search for the right spice into a quick visual scan. Arrange spices alphabetically or by cuisine—whatever makes sense to you. The key is consistency and visibility .
In the refrigerator, clear bins corral similar items and prevent the accumulation of forgotten containers. Group dairy together, condiments together, leftovers in a designated zone. When you can see everything at a glance, you’re less likely to lose items in the depths and more likely to use what you have before it spoils .
8. Drawer Dividers: Order Within Chaos
Drawers are notorious for becoming chaotic catch-alls. Without organization, utensils tangle, tools hide, and finding anything requires digging. Drawer dividers transform this chaos into order .
The simplest solution is adjustable bamboo dividers. These can be configured to fit any drawer size and reconfigured as your needs change. Use them to create compartments for utensils, measuring spoons, kitchen shears, and other tools. The compartments prevent items from sliding around and becoming tangled .
For deep drawers, consider tiered organizers that create two levels of storage. These are particularly useful for storing items like storage containers and their lids—place containers on the bottom, lids on the top, and you’ll never again dig through a pile searching for the matching lid .
Drawer inserts designed specifically for cutlery keep knives, forks, and spoons organized and easy to access. For small kitchens where drawer space is limited, consider combining cutlery with other utensils in a single drawer, using dividers to create distinct zones for different categories .
The key to drawer organization is that every item has a designated spot. When you open the drawer, you should see everything at once, not a jumble. Items should be easy to remove and easy to return. This makes cooking more pleasant and maintenance more likely .
9. Vertical Space: Thinking Upward
In a minimalist kitchen, every inch counts, and vertical space is often underutilized. By thinking upward, you can increase storage capacity without expanding your kitchen’s footprint .
Open shelving is the most dramatic vertical solution. Removing upper cabinet doors or installing floating shelves creates storage that forces curation—you display only your most beautiful and frequently used items. The visual weight of items on open shelves draws the eye upward, making the kitchen feel larger .
For a more modest approach, consider stackable shelves within existing cabinets. These create two levels of storage on a single shelf, effectively doubling capacity. Use them for mugs, small bowls, or spices—items that don’t need the full vertical clearance .
Under-shelf baskets attach to the shelf above, creating storage underneath. These are perfect for lightweight items like kitchen towels, pot holders, or small packages. They utilize space that would otherwise be empty while keeping items visible and accessible .
Wall-mounted racks and rails keep frequently used items accessible without consuming counter space. Mount a rail with hooks near the stove to hold utensils, pot holders, and small tools. This keeps them within reach while maintaining clear counters .
10. The Beauty of Empty Space
In the pursuit of organization, it’s easy to focus entirely on filling space efficiently. But in a minimalist kitchen, empty space is as important as filled space. Empty space provides breathing room, makes access easier, and prevents the feeling of being overwhelmed .
When organizing cabinets, don’t pack every shelf to capacity. Leave some room—an inch or two between items, a little space at the front of shelves. This makes items easier to remove and return, and it prevents the jamming that happens when things are too tight .
In drawers, the same principle applies. Compartments should be sized appropriately for their contents, not so large that items slide around, but not so tight that items are difficult to remove. A little wiggle room makes the drawer functional rather than frustrating .
On counters, empty space is essential. A clear workspace invites cooking. A cluttered counter discourages it. Resist the temptation to fill every inch with appliances or decor. Leave room for the work of cooking, for the ingredients you’re preparing, for the pleasure of an uncluttered surface .
Empty space also makes cleaning easier. You can wipe down counters without moving a dozen items. You can sweep under cabinets without navigating obstacles. The kitchen stays cleaner with less effort because there’s less to work around .
11. Maintenance Systems: Keeping Minimalism Alive
The work of minimalist organization doesn’t end when the cabinets are tidy and the counters are clear. Without maintenance systems, the kitchen will slowly revert to chaos. The key is building habits that make maintenance effortless .
The first habit is the five-minute tidy. At the end of each day, spend five minutes returning stray items to their homes. That utensil left by the stove goes back in the drawer. That spice left on the counter returns to its shelf. This small daily investment prevents the gradual accumulation of out-of-place items .
The second habit is the weekly reset. Once a week, take a few minutes to assess your kitchen. Is everything in its place? Have any items accumulated that don’t belong? Are there any areas that need attention? This weekly check catches problems before they become overwhelming .
The third habit is seasonal auditing. Every few months, go through one category of items—utensils, perhaps, or pantry goods—and reassess. Are you using everything? Has anything new accumulated that doesn’t belong? This regular check prevents the slow creep of clutter .
The fourth habit is mindful acquisition. Before bringing any new item into your kitchen, ask the minimalist questions: Do I really need this? Where will it go? What will I give up to make room for it? This thoughtful approach prevents the accumulation that necessitates future purges .
12. The Minimalist Kitchen Mindset: Ongoing Practice
Minimalism is not a destination but an ongoing practice. It requires continuous attention, regular reassessment, and a willingness to let go of things that no longer serve you .
Your kitchen will change over time. Your cooking habits will evolve. Your household size may shift. Your needs will be different next year than they are today. Minimalism accommodates these changes by keeping you connected to your actual needs rather than accumulated possessions .
When you notice frustration with your kitchen—a drawer that’s hard to close, a cabinet where things get lost—see it as information. Something needs attention. Perhaps you’ve accumulated too much. Perhaps your organization system isn’t working. Perhaps an item has migrated from its home. Address the frustration rather than accepting it .
Celebrate your progress rather than focusing on perfection. A kitchen that is 80 percent organized is far better than one that is completely chaotic. The goal is not to achieve some idealized state but to create a space that works better for you than it did before .
| Minimalist Principle | What It Means | Beginner Action | Maintenance Required |
|---|---|---|---|
| Mindset First | Understand minimalism before acting | Read, reflect, set intentions | Regular reality checks |
| The Great Purge | Remove everything unnecessary | Category-by category elimination | Seasonal audits |
| One-In, One-Out | Prevent reaccumulation | Commit to the rule | Apply to every new acquisition |
| Zoning by Function | Group items by use | Map your kitchen zones | Adjust as needs change |
| Frequency-Based Placement | Store by how often used | Audit item frequency | Reassess annually |
| Clear Counters | Counters are workspace, not storage | Remove everything; add back only essentials | Daily reset |
| Container Consistency | Uniform storage for dry goods | Transfer to clear, uniform containers | Label and date |
| Drawer Dividers | Compartmentalize drawer chaos | Install adjustable dividers | Adjust as contents change |
| Vertical Space | Use walls and height | Add shelves, racks, risers | Keep accessible |
| Empty Space | Leave breathing room | Resist overfilling | Maintain during use |
| Maintenance Systems | Habits that preserve order | Establish daily, weekly, seasonal routines | Stick to them |
| Ongoing Practice | Minimalism is a journey | Accept imperfection; keep adjusting | Never stop learning |
The Emotional Journey of Kitchen Minimalism
The process of minimalist kitchen organization is not merely practical—it is emotional. It forces you to confront your relationship with possessions, your habits of acquisition, your attachment to items that no longer serve you .
You may feel guilt about discarding items that were gifts, or that cost money, or that represent aspirations you never fulfilled. This guilt is normal, but it should not prevent you from creating a kitchen that works. The gift has served its purpose—it was given in love, and you are free to release it. The money is spent whether you keep the item or not. The aspiration can be released or pursued with better tools .
You may feel anxiety about letting go of items you might need someday. This anxiety is understandable, but it is also the enemy of minimalism. The truth is that for most items, “someday” never comes. And for the rare occasion when you actually need something you’ve discarded, you can borrow, buy again, or do without. The cost and inconvenience of these rare events is far less than the daily burden of storing things you don’t use .
You may feel freedom as the clutter clears. This is the reward. The emotional weight of excess possessions is real, and releasing it is liberating. A clear kitchen brings mental clarity. Cooking becomes easier, more pleasurable, more frequent. The space that once frustrated you now supports you .
Conclusion : Minimalist Kitchen Organization Guide for Beginners
Minimalist kitchen organization for beginners is not about achieving perfection overnight. It is about taking the first steps toward intentionality, about reducing the burden of excess, about creating a space that works for you rather than against you.
The journey begins with mindset—understanding that minimalism is about keeping what you use and love, not about deprivation. It continues through the great purge, the difficult but essential work of removing what doesn’t belong. It builds with zoning, placement, and organization systems that make your kitchen efficient and calm. It sustains through maintenance habits that prevent reaccumulation. And it evolves through ongoing practice, as your needs change and your understanding deepens.
Start where you are. Choose one category, one drawer, one cabinet. Apply these principles and experience the satisfaction of an organized space. Let that satisfaction motivate you to continue. Gradually, your kitchen will transform from a source of frustration into a space of possibility—a place where cooking is a pleasure, where everything has a home, where minimalism creates room for what matters most.
The minimalist kitchen is not empty. It is full—full of the things you actually need, full of the tools you actually use, full of the space and calm that make cooking a joy. That is the promise of minimalism: not less for the sake of less, but more of what matters. Your kitchen awaits.
1 thought on “Minimalist Kitchen Organization Guide for Beginners”